 Home
HomeFinal Cut Pro offers one of the most widely used editing platforms for content created with Panasonic’s P2 system. With each new version of FCP, its capabilities regarding P2 are enhanced and made more efficient.
P2 media is recorded in MXF format, it offers a variety of formats to choose from (DV, DVCPRO, DVCPRO 50, DVCPRO HD, and AVC-Intra 50 and AVC-Intra 100), differing in bit depth (8 or 10 bits), scanning mode (Progressive or Interlaced) and also frame rate. The Panasonic’s 10-bit AVC-Intra codecs (AVC-Intra 50 and AVC-Intra 100) are very demanding on your computer’s processor. If you find your FCP editing system does not operate with the same level of performance as with FCP codecs (such as Apple ProRes 422), you may need a more powerful computer, or convert the P2 HD AVC-Intra 50/AVC-Intra 100 codec video into a FCP ProRes codec.
This tutorial has been written for people attempting to work with P2 within the Final Cut Pro editing environment. It describes how to transcode P2 HD AVC-Intra 50/AVC-Intra 100 to Apple ProRes for FCP importing on Mountain Lion using Pavtube AVC-Intra MXF to FCP Converter.
Cautions:
Within “CONTENTS” you can see that there is a folder for AUDIO, CLIP, ICON, PROXY, Video and VOICE, and each folder contains only those specific parts of the video stream. If you have some loose .MXF clips only, your files will have image only without audio. So make sure you have the entire MXF file structure as it saved on your P2 card while importing to Pavtube software to do format conversion. Only when you importing .MXF clips from the correct file structure, Pavtube P2 AVC-Intra MXF to FCP Converter is able to recognize audio tracks from ‘AUDIO’ folder automatically, which guarantees the generated ProRes MOV files have both image and sound correctly.
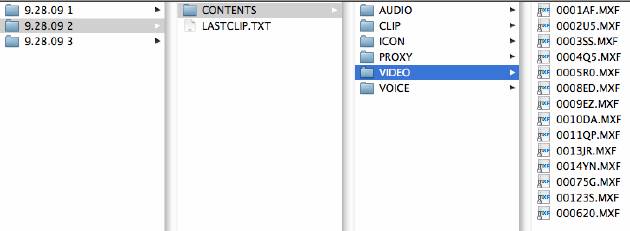
P2 Media Folders on HDD
Step-by-step instruction:
How to convert P2 AVC-Intra video to ProRes for using in Final Cut Pro?
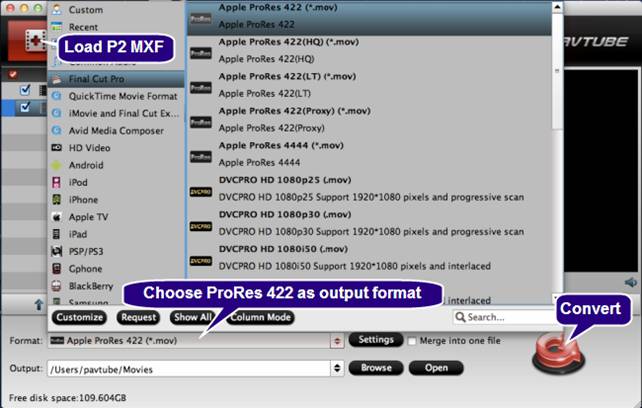
1. Load P2 AVC-Intra 50/100 MXF videos into Pavtube MXF to ProRes 422 Converter for Mac via clicking “Add video” or “Add from folder” icon.
2. Choose “Apple ProRes 422 (*.mov)” as output format for Final Cut Pro 6/7 or FCP X.
3. Click “Convert” button to start Panasonic P2 AVC-Intra MXF to ProRes 422 conversion. Once finished, you can click “Open” button to get the produced Apple ProRes 422 files for editing with Final Cut Pro.
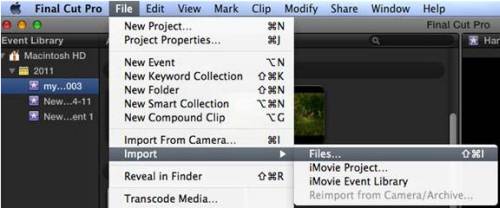
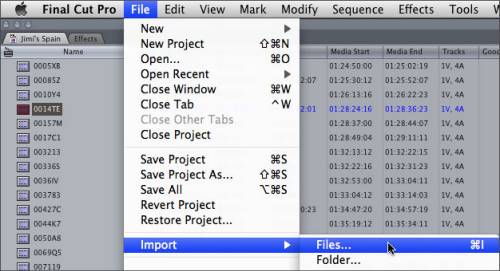
Import your ProRes MOV clips into Final Cut Pro X or Final Cut Pro 6/7 through File > Import > Files…
Additional Contents
If you intend to burn MXF footage taken with Panasonic’s P2 AVC-Intra camcorder onto a blank DVD disc for delivering or sharing, you can give Pavtube DVD Creator for Mac a shot. It comes with two versions, one is Free Version, and the other is Retail version. By using the Free Version, you can create DVDs from common video files such as MOV, MKV, AVI, TiVo and more. By using the Retail Version, you can make DVDs from MXF, AVCHD camcorder footage and even still pictures. The DVD Creator for Mac Retail Version currently has a 50% off 2012 Halloween sale. Take it easy to make you own selection:


Read more to compare DVD Creator for Mac Free Version with Retail Version
 Free Trial MXF Converter for Mac

Useful Tips
- How to burn Final Cut Pro projects to DVD on Mac?
- DVD to Final Cut - How to rip DVD to edit in FCP, FCP X, FCE on Mac?
- Enable Final Cut Pro 6/7 and FCP X to work with NEX-6 50p/60p MTS clips
- Canon C500 MXF Footage and Final Cut Pro (X) workflow - C500 MXF transcoding to ProRes 422
- Using P2 AVC-Intra 50/AVC-Intra 100 MXF footage with Final Cut Pro
- Canon C100 and FCP workflow - how can I edit Canon C100 AVCHD with FCP (X)?


