 Home
HomeCanon unveils the EOS C100, a 'budget' addition to its Cinema EOS range of professional video cameras. Based on the core performance of the acclaimed EOS C300, the new model combines impressive hardware specifications with a range of new automatic features - making it ideal for videographers who shoot without a crew, or EOS shooters entering the Cinema EOS System for the first time. The C100 records 1920 x 1080 Full HD movies in AVCHD format to SD cards at a bit rate of 24Mbps, offers an ISO range of 320-20000, and can output uncompressed video directly to external recorders. It is available from November 2012 at a price of $7,999.
Canon EOS C100 Key Features
* 8.3MP Super 35mm CMOS sensor; Full HD
* High sensitivity, low noise
* 24Mbps AVCHD to SD cards
* Automatic shooting functions
* Interchangeable EF lenses
* Canon Log Gamma
* Compact, modular, lightweight
* Professional audio
* Seamless workflow integration
* CPS video support
How can I edit Canon C100 AVCHD with Final Cut Pro (X)?
To import AVCHD footage correctly, Final Cut Pro (FCP 6/FCP 7/FCP X) requires the directory structure of the C100 footage must be the same as when it was recorded to the card. If you’ve copied your footage onto a hard drive or other storage media and only kept part of the file structure you’re going to be presented with an unsupported media error message like this one…

The solution is to rewrap before import, using Pavtube MTS/M2TS Converter for Mac.
![]()
Notes:
1. The free trial version is provided for you to see if it would be able to convert your AVCHD format video from a Canon C100 camera.
2. The trial version will create videos with PAVTUBE logo standing in the center of the output image. To bypass the watermark, you should purchase its full version.
![]()
How to rewrap Canon C100 MTS clips to Final Cut Pro (X) editable file format?
1. Start up Pavtube MTS/M2TS Converter as a Canon C100 to FCP Converter. Click “Add video” or “Add from folder” icon to load your source files directly from your camera, or from a card reader, or from the file folder that contains the source MTS videos stored on your computer’s hard disk drive. You can batch convert by highlighting all the clips you just imported or one by one.
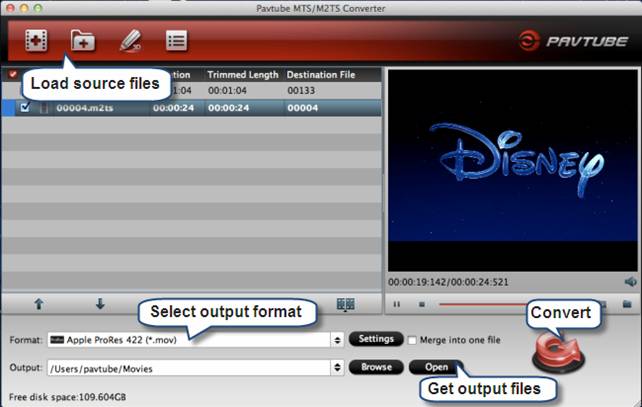
2. From “Format” menu > “Final Cut Pro” column to choose “Apple ProRes 422 (*.mov)” as output format for Final Cut Pro 6/7 or Final Cut Pro X.
3. Click “Convert” button to start transcoding Canon C100 MTS files to Final Cut Pro editable Apple ProRes 422 codec.
4. Once the conversion finished, click “Open” button to get the generated Apple ProRes 422 MOV files.
How to import the converted Canon C100 AVCHD clips to Final Cut Pro (X) for further editing?
Launch Final Cut Pro 7/FCP 6/FCP X, choose File > Import > Files…, and browse to where you save the converted AVCHD clips to. Choose the videos that you’d like to add.

 Free Trial MTS/M2TS Converter for Mac

Useful Tips
- How to burn Final Cut Pro projects to DVD on Mac?
- DVD to Final Cut - How to rip DVD to edit in FCP, FCP X, FCE on Mac?
- Enable Final Cut Pro 6/7 and FCP X to work with NEX-6 50p/60p MTS clips
- Canon C500 MXF Footage and Final Cut Pro (X) workflow - C500 MXF transcoding to ProRes 422
- Using P2 AVC-Intra 50/AVC-Intra 100 MXF footage with Final Cut Pro
- Canon C100 and FCP workflow - how can I edit Canon C100 AVCHD with FCP (X)?


