 Home
HomeFor enhanced creativity, and to accommodate a variety of workflows, the Canon Cinema EOS C500 camera offers a range of 10- and 12-bit imaging modes. These comprise: 4K Output Priority Mode in resolutions up to 4096x2160 pixels; 2K Output Priority Mode in resolutions up to 2048x1080 pixels; and internal MXF File format recording up to 50 Mbps, utilizing MPEG-2 data compression at a variety of user-selectable frame rates and image resolutions.
Canon C500 MXF Footage and Final Cut Pro (X) workflow
Apple’s Final Cut Pro (FCP 6/ FCP 7/ FCP X) software for non-linear editing (NLE) has become a dominant choice among enthusiasts and dedicated professionals alike. This professional Apple software application is well known for its smooth performance and editing speed, both invaluable assets for editing software.
On a few occasions, Canon XF Utility doesn’t work well as expected. The MXF footage (MPEG-2 compression format) shooting with a Canon C500 requires to be transcoded into a format better suited to FCP editing, effects, and color grading; this would usually be Apple ProRes 422. The C500 MXF transcoding to ProRes 422 can be a fairly time- and processor-heavy intermediary step that pays off later with superior speed once the post production process begins. That’s where Pavtube MXF Converter for Mac comes in: it doesn’t eliminate the need for transcoding, but it makes the experience of editing Canon C500 MXF HD footage with Final Cut Pro (X) as fast and seamless as possible.
![]() Free download Pavtube MXF Converter for Mac Trial Version
Free download Pavtube MXF Converter for Mac Trial Version
Notes:
1. The free trial version is provided for you to see if it would be able to convert your MXF format video from a Canon C500 camera.
2. The trial version will create videos with PAVTUBE logo standing in the center of the output image. To bypass the watermark, you should purchase its full version.
![]()
How to transcode Canon C500 MXF clips to FCP 6/7 and FCP X editable ProRes 422 file?
1. Open up Pavtube MXF Converter for Mac as the best Canon C500 MXF Converter for FCP. Click “Add video” or “Add from folder” icon to load your source MXF files directly from your EOS C500 camera, or from a CF card reader, or from the file folder that contains the source MXF videos stored on your computer’s hard disk drive.
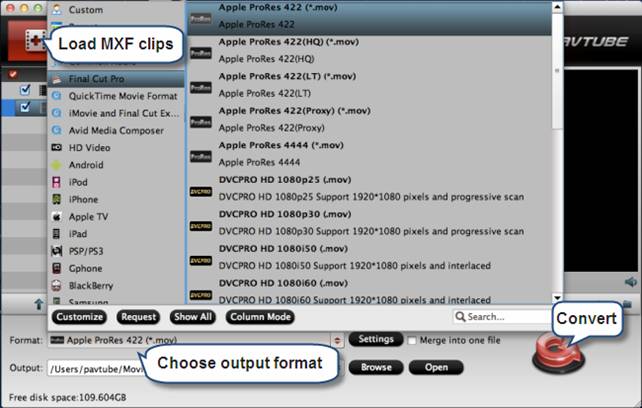
2. Select “Apple ProRes 422 (*.mov)” as target format for Final Cut Pro (X) under “Final Cut Pro” option.
3. Click “Convert” button to start converting Canon C500 .MXF shootings to ProRes 422 for FCP editing. Once the MXF transcoding finished, click “Open” button to get the generated ProRes files.
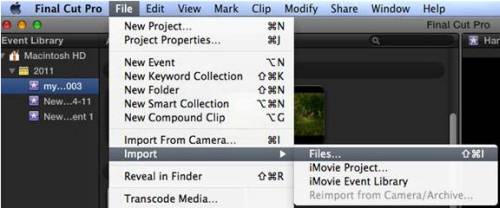
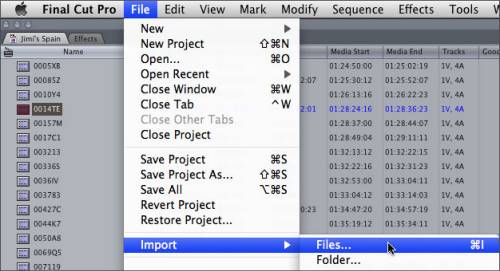
Now you are ready to import the rewrapped C500 MXF clips into Final Cut Pro X or Final Cut Pro 6/7 for post-production without rendering through File > Import > Files…
Related links
MXF to Final Cut – editing Canon XF100 .mxf files in FCP X
Transfer Canon C300 MXF to FCP/Quicktime for editing on Mac
Convert P2 MXF to Apple ProRes 422 on Mac for Final Cut Pro
Canon XF300 MXF Converter for Mac-Convert MXF to Prores for FCP
 Free Trial MXF Converter for Mac

Useful Tips
- How to burn Final Cut Pro projects to DVD on Mac?
- DVD to Final Cut - How to rip DVD to edit in FCP, FCP X, FCE on Mac?
- Enable Final Cut Pro 6/7 and FCP X to work with NEX-6 50p/60p MTS clips
- Canon C500 MXF Footage and Final Cut Pro (X) workflow - C500 MXF transcoding to ProRes 422
- Using P2 AVC-Intra 50/AVC-Intra 100 MXF footage with Final Cut Pro
- Canon C100 and FCP workflow - how can I edit Canon C100 AVCHD with FCP (X)?


