Home
HomeFor those people who want to manage the files on their tablets, smartphones, and other portable devices, Google Drive should be the best choice. It is a popular cloud-storage app with three subscriptions – 15GB, which is free; 100GB for $1.99 a month; and 1TB for $9.99 a month. With Google Drive, you can share files, sync files and integrate your account with third-party apps. In this article, we are talk about how to transfer all your Blu-ray and DVD collection to Google Drive for storing, streaming and watching easily and freely.
How to Backup Blu-ray DVD Movies to Google Drive
To upload Blu-ray and DVD movies to Google Drive, there are many things you should take into consideration. Firstly, we'd better get well know of which formats are supported by Google Drive and work well on devices. Details as below:
WebM files (Vp8 video codec; Vorbis Audio codec)
MPEG-4, 3GPP, and MOV files (H.264 and MPEG4 video codecs; AAC audio codec)
AVI (MJPEG video codec; PCM audio)
MPEG PS (MPEG2 video codec; MP2 audio)
WMV
FLV (Adobe – FLV1 video codec, MP3 audio)
MTS
Secondly, unlike other common digital formats, Blu-ray and DVD disc are usually protected with a special security encryption. You will need a special Blu-ray and DVD ripping tool to strip off this protection.
Realated: How to Remove DVD Copy Protection? | Remove Blu-ray Copy Protection AACS, BD+, Cinavia
In addition, Blu-ray and DVD disc are also rather large file size, you will need plenty of space on your Google Drive to save the files. For example, although you can get 15GB free online storage space, but a conventional Blu-ray disc will contain 25GB per layer and 50 GB of dual layer. Therefore, you can use the following method to reduce video size:
– Trim unwanted parts or segments from the movie without any quality loss
– Split your large movie into small file size by file size, count or lenght
– Output a file format with better quality and small file size such as FLV, WMV
– Lower the output video resolution
– Lower the bit rate 20-50% of the default to get small files
– Lower the frame rate of the video to 15 or 10 fps can reduce the file size by as much as 1/2 or 2/3
How to compress and upload Blu-ray and DVD movies to Google Drive in high quality? Here Pavtube BDMagic (Get Mac version) is highly recommended to fulfill your needs. It is not only good at ripping any protected Blu-rays and DVD to Google Drive supported file formats in fast speed while keep its original video quality, but also provides 250+ popular video/audio formats for playing on iPhone, iPad, Android phone and tablet, PS4, Xbox One, etc.
You can also utilize this tool to backup your favorite Blu-ray and DVD movies to other cloud storage services, such as Dropbox, Microsoft OneDrive, Apple iCloud, Amazon Cloud Drive, etc. Moreover, to output Blu-ray and DVD in small file size for uploading to Google Drive, the program enables you to select only your wanted chapters to backup. The built-in video editing function also helps you to compress Blu-ray/DVD movie file size.
Step by Step to Compress and Upload Blu-ray DVD movies to Google Drive
Windows Version Pavtube BDMagic taken as example, Mac share the same steps. Just keep in mind you have download the right version, Windows platform .exe files cannot be installed on macOS – and vice versa.
Step 1. Load Blu-ray and DVD content
After download and install this best BD/DVD to Google Drive converter, run it. Click “File” > “Load from disc” to add Blu-ray/DVD disc to the program. Blu-ray/DVD folder, Blu-ray/DVD ISO image file, DVD IFO file are also allowed.
On the right windows, you can preview your files and take snapshots of your favorite movie scenes.
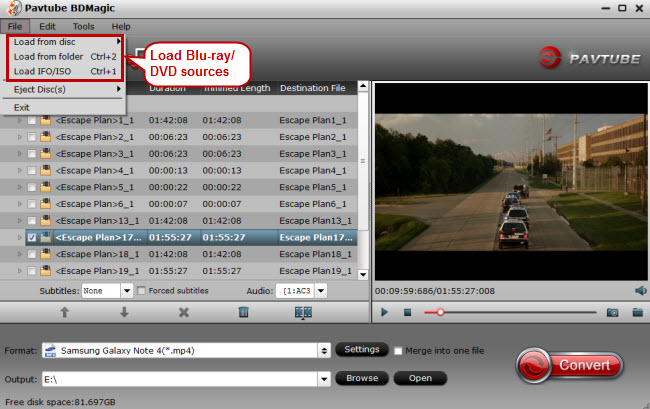
Tip: This program enables you to choose one of your favorite audio and subtitle tracks for your movie, then check the "Forced Subtitle" options. And the "Forced Subtitles" will only appear when the actors speak a different language from the subtitle tracks that you have specified in your movies.
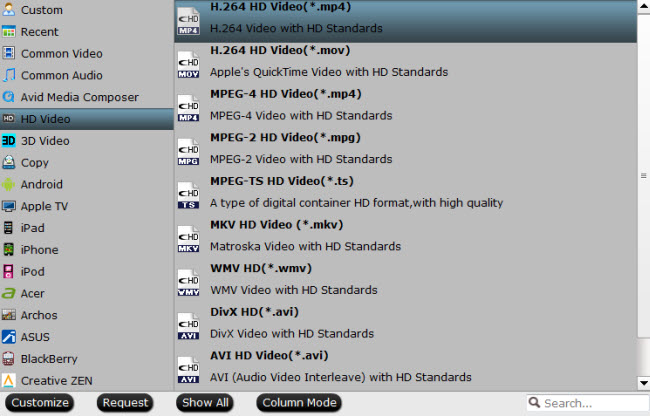
Step 2: Specify output file format
Click “Format” bar, from its drop-down options, choose Google Drive readable format from “Common Video” and "HD Video" profile list, here, you can choose to output “H.264 HD Video (*.mp4)” file format. You are also allowed to output other Google Drive supported format such as AVI, WMV, FLV, MOV, MTS, MPEGPS, 3GPP, WebM.
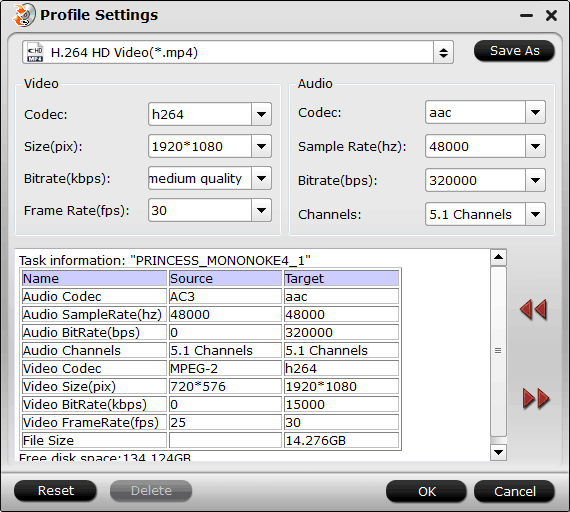
Step 3: Compress Blu-ray/DVD movies
Comparing to other video parameters, video resolution and bitrate affects video size more. In general, a higher bitrate and resolution will accommodate higher image quality and video size in the video output, therefore, you can compress your movie video size by decreasing video resolution and bitrate. Adjusting video frame rate is also an effective way to resize video. Just have a try.
Editor's Note: Keep in mind that the maximum resolution for playback in Google Drive is 1920x1080.
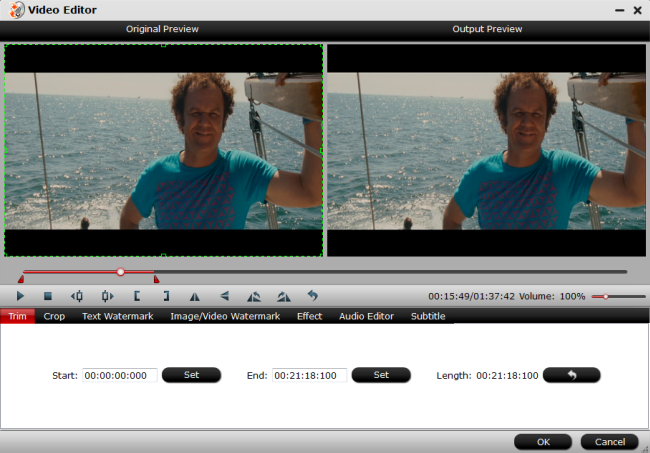
In the “Video Editor” window, go to the “Trim” tab, you can trim the video length by dragging the slider bar to set the starting time and ending time to short the length of the video.
Step 4. Start Ripping Blu-ray DVD for Google Drive
With all settings, click Convert button to rip and convert Blu-rays/DVD to Google Drive supported video formats. Once finished, hit the “Open output folder” on the main interface to get the converted Blu-ray/DVD movie files. Then transfer and upload video files to Google Drive with the 2 ways offered below:
Drag and drop:
If you’re using the latest version of Chrome or Firefox, you can drag a folder from your desktop into Google Drive. You can also drag files directly into folders or sub folders.
Upload files using Google Drive
1. Go to drive.google.com.
2. On the left, click “New”.
3. Select “File upload”.
4. Select file you want to upload from. To select multiple files, press “Ctrl (PC)” or “Command (Mac)” and click all the files to upload.
5. You’ll see a box that shows the progress of your file upload. To open the file, click the file name. To close the box, click the “X”.
 Free Trial BDMagic