Home
HomeA lot of laptops are coming without DVD drives these days, like Apple's MacBook Pro and MacBook Air, but the fact of the matter is that most of us still use CDs, DVDs, Blu-Rays, and other optical discs these days, although online stores like iTunes, Amazon, and Netflix provide us with much movies, TV shows and music. In this post, we will show you all the methods to watch DVD movies on MacBook Pro/Air. You will see it's not that hard.
Method 1: Get an External Drive
Method 2: Use Remote Disc Sharing
Method 3: Rip and Digitize your DVD Collection
Method 1: Get an External Drive
The easiest option is to simply purchase an external USB DVD drive. Just jack it into your MacBook's USB port and shove your discs into it as needed. With it you can play DVD movies, play and rip CDs with iTunes, and install software if it’s compatible with your MacBook Air/Pro.
Apple offers their own external drive known as the Apple USB SuperDrive, about $80. It plugs into a Mac via a USB cable and allows you to both read and write CDs and DVDs, no Blu-ray support. Of course Apple's isn't the only solution. You can also buy third-party ones, and you’ll find many of them on Amazon and elsewhere.
Method 2: Use Remote Disc Sharing
If you have access to another Windows or Mac computer that does have a media drive, your options expand a bit. In such a situation, it's possible to use DVD discs without buying an external drive thanks to the built-in Remote Disc feature.
For Mac computer:
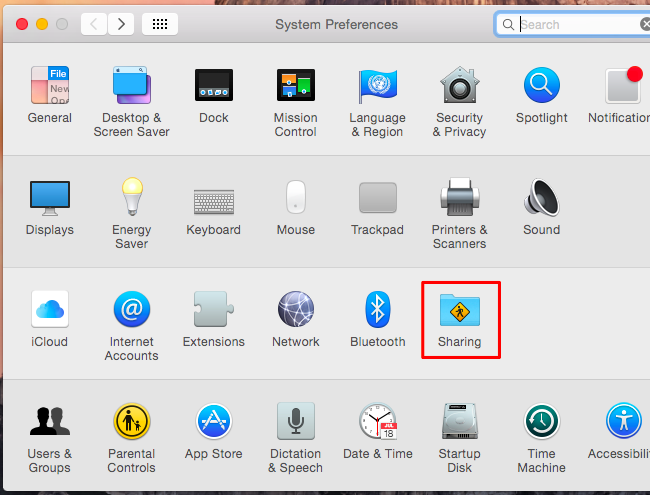
First, you'll need to set up the server on a remote computer with a disc drive. If the computer with a disc drive you want to share is a Mac, click the Apple menu, click System Preferences, and click the Sharing icon. Activate the “DVD and CD Sharing” option in the Sharing list. (This option will only be visible if your Mac has an optical drive.)
For Windows PC:
If it’s a Windows PC, you’ll need to download and install the DVD & CD Sharing Update for Windows from Apple’s website. After you have, open the Control Panel, click Hardware and Sound, and then click DVD or CD Sharing Options. Check the “Enable DVD or CD Sharing” box here.

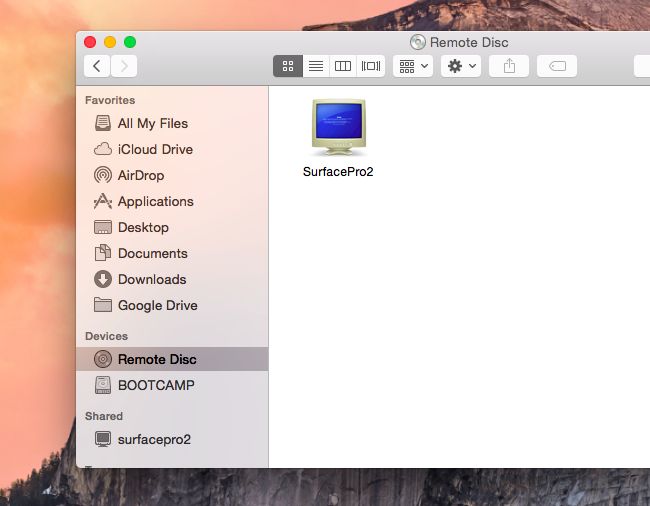
Once you've enable the remote disc sharing on either a Mac or Windows computer, you can open the Finder on your MacBook Air/Pro without a disc drive. Click the “Remote Disc” option under Devices in the sidebar and you’ll see any Mac or Windows PC sharing a disc on your network. Depending on your settings, you may have to agree to a request on the remote PC before you can access its disc.
Although this sharing option means that you needn’t purchase an additional drive, it's also pretty limited. You can’t play DVD movies or audio CDs, copy-protected discs (game discs, for example) won’t work.
Method 3: Rip and Digitize your DVD Collection
Everyone I know that's nervous about getting a MacBook Pro or MacBook Air is worried about one thing: watching DVD movies while on-the-go, since no one wants to lug around an external drive with them. Any other options? Sure. In an age of digital media, it's about time you turned your DVD collection into common movie files you can watch from any device on the go.
You have a few options when it comes to ripping DVDs. We recommend the Pavtube BDMagic (Get Mac Version) method, which works on both Windows and OS X. This DVD ripper is able to convert DVD to MP4, H.264, H.265, MPEG4, MOV, iTunes, etc for easily playback on MacBook Air/Pro QuickTime player. More importantly, compared with other freeware, it has the ability to support different type of DVDs with encryptions. It also help you get Blu-ray playback on MacBook (Air/Pro).
Bonus benefit: Besides ripping DVD into digital formats, this DVD to MacBook converter also can make you choose desired subtitle, forced subtitle, to keep multiple subtitles and to add external subtitle to DVD movies. This function is very necessary when you watch foreign DVD movies on MacBook Air/Pro.
Free Download:


Steps to Rip and Digitize DVD to MacBook Air/Pro for watching
Note: The snapshots are from Mac version but the DVD to MacBook Air/Pro copy steps are suitable for both Windows version and Mac version.
Step 1. Load DVD movies
Run DVD to MacBook Air/Pro converter and import your DVD disc by clicking "Load Disc" button. DVD Folder, DVD IFO File and DVD ISO Image File are also supported.
You can preview the loaded DVD in the right viewing window and you can also take snapshots as you like.
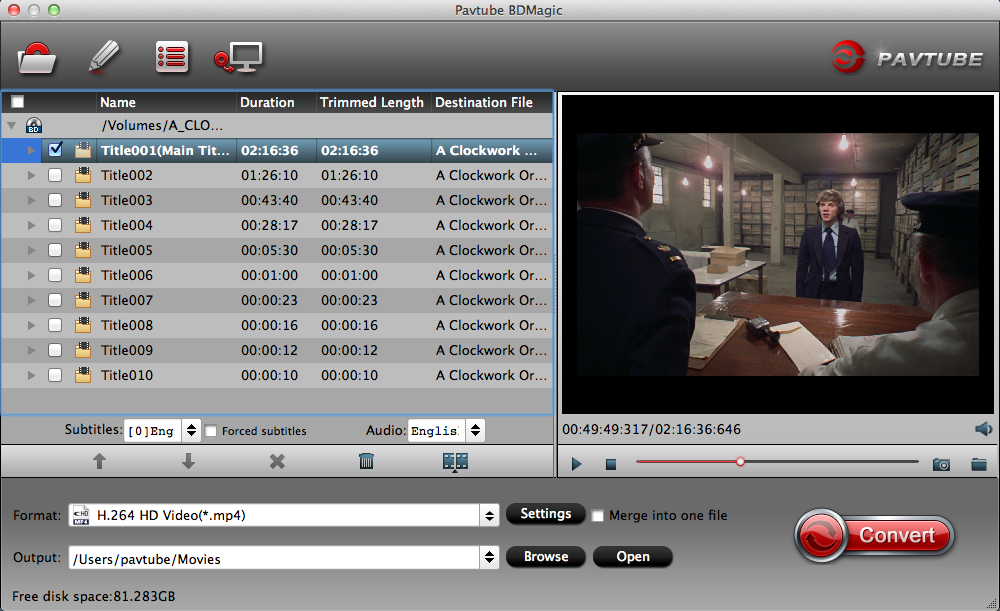
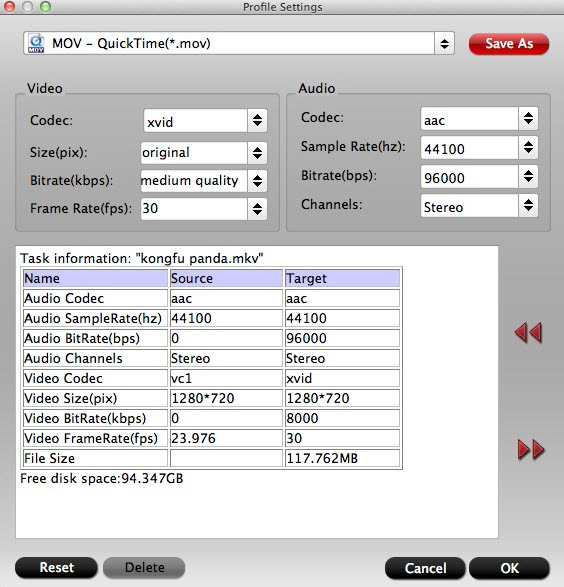
Step 2: Choose format for MacBook Air/Pro
Pavtube BDMagic offers you hundreds of output video formats. If you plan to play DVD movies with QuickTime on MacBook Air/Pro, you are advised to choose "MOV - QuickTime(*.mov)" under "Common Video" or choose the preset for QuickTime from "QuickTime Movie Format".

Tip: Some models of MacBook Air/Pro support 1880p, even 2160p resolution. But here, we suggest you to choose 1080p or 720p because lower resolution can save the storage space so that you can store more DVD movies on MacBook Air/Pro to watch in the planes, on trains, in the airports.
Step 3: Start DVD to MacBook Air/Pro conversion
At last, when all the settings are done, go back to the UI, then hit big red "Convert" to start to copy DVD to MacBook Air/Pro with excellent video quality.
Note: This method needs another computer with hard drive or an external hard drive to do the ripping in advance.
 Free Trial BDMagic