 Home
HomemacOS High Sierra is the codename of macOS 10.13 version of the Mac operation system that released in the fall of 2017. macOS High Sierra runs on the late 2009 or newer iMac, MacBook; 2010 and later MacBook Air, MacBook Pro, Mac mini, Mac Pro; and 2017 iMac Pro. Naturally, this OS doesn't support native Blu-ray playback as all other Mac operating systems do. Read on to learn two workarounds to play Blu-ray movies on macOS High Sierra MacBook (Air/Pro)/Mac Mini/Mac Pro/iMac Pro/iMac.
Solution One: Play Blu-ray movies with third party Blu-ray player Software
As no Mac computer including iMac, Macbook Pro, Macbook Air or Macbook shipped with a drive to read data on a Blu-ray disc, the first step to play Blu-ray movies on macOS High Sierra MacBook (Air/Pro)/Mac Mini/Mac Pro/iMac Pro/iMac is to purchase professional Blu-ray player software as well as an external Blu-ray drive.
Generally, an external Blu-ray drive which will cost you less than $50 or some good drive that will range from 80$ to $100. As for the Blu-ray player software for Mac, there are many different options, two of the popular are Aurora Blu-ray Player for Mac ($39.95) and Macgo Mac Blu-ray Player( ($39.95).
Solution Two: Rip or Convert Blu-ray movies to QuickTime Movie Format for Viewing
Since MOV is the most ideal format for playing on Mac, you can convert Blu-ray to MOV for playback on Mac (macOS High Sierra, mac Sierra, El Capitan, Yosemite, Mavericks included), so that you can conveniently watching Blu-ray movies on MacBook without Blu-ray drive when you are out for traveling or stream Blu-ray movies from iMac/MacBook Pro to Apple TV 4K for viewing on large screen TV.
In this case, a versatile Blu-ray ripper converter is in need. Pavtube ByteCopy for Mac is such an excellent program that combines Blu-ray ripper, Blu-ray editor, Blu-ray player. This software not only allows you to rip Blu-ray to various different file formats for enjoying on macOS High Sierra MacBook (Air/Pro)/Mac Mini/Mac Pro/iMac Pro/iMac with QuickTime player or transfer and stream to iPhone 8, Apple TV 4K, etc. but also gives you the chance to backup Blu-ray to lossless multi-track MKV format for better storage or playback.
What's more, as the best Blu-ray ripper, it can 1:1 entire copy Blu-ray with original video structure or copy Blu-ray to M2TS only preserving Blu-ray movie main title. Plus, the built-in video editor allows you to trim, crop, add watermarks, add external subtitles, etc. to get the very part and effect you prefer. Windows version is here.
Steps to Rip Blu-ray for macOS High Sierra MacBook (Air/Pro)/Mac Mini/Mac Pro/iMac Pro/iMac
Step 1: Load source Blu-ray files
After starting Pavtube ByteCopy for Mac, click the “Load Disc” button, or directly drag and drop to load source Blu-ray disc, folder or ISO Image File. After loading, you can select Subtitles and Audio tracks for each title, click the play button on the thumbnail to preview source files.
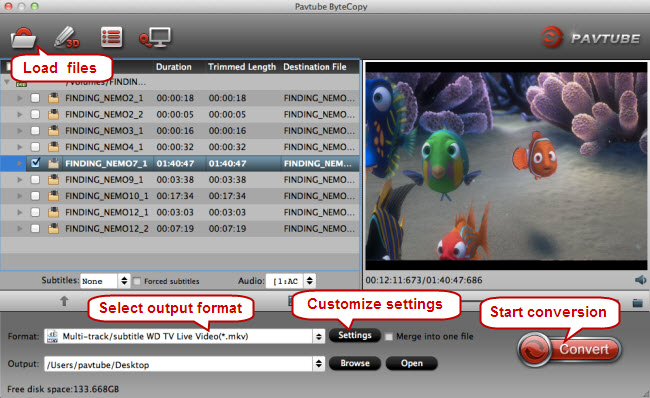
Step 2: Select output format
Click "Format" bar, from its drop-down list, for viewing Blu-ray movies on macOS High Sierra with QuickTime player, just output "MOV - QuickTime(*.mov)" under "Common Video" main category or choose the preset for QuickTime from "QuickTime Movie Format" category.

With the rising popularity of 4K video, a new industry standard arrives on Mac — HEVC (High Efficiency Video Coding, also known as H.265). It can compress video up to 40 percent more than H.264, the current standard for video compression. Using HEVC, videos stream better and take up less space on your Mac, while preserving the same visual quality. If you want H.265 video, just choose to output H.265 video from "Common Video" or "HD Video" category. Also you can click “Settings” button to set video and audio settings.
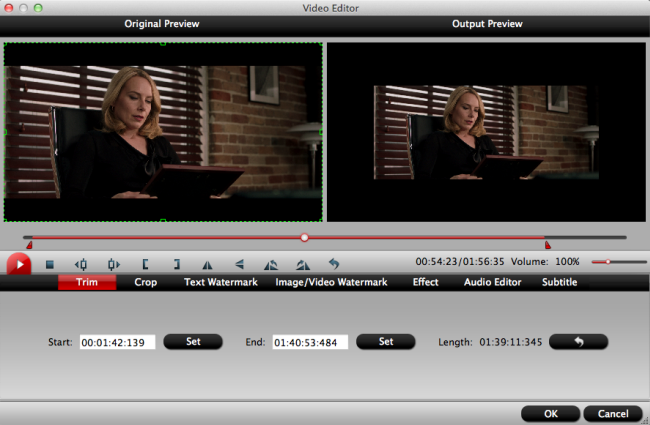
Step 3: Edit Blu-ray movies
Select a movie title or chapter on the main interface to active the "Editor" function, then click the Edit icon on the tool bar of main interface to open the Editor Window, you can play and preview the original Blu-ray movies and output effects. Also you can flip Blu-ray, trim, crop, add effect, reset, and adjust volume,etc.
Step 4: Begin Blu-ray to MacBook (Air/Pro)/Mac Mini/Mac Pro/iMac Pro/iMac conversion process
After all settings are done, go back to the UI, then hit the big red "Convert" to start to copy Blu-ray to MacBook (Air/Pro)/Mac Mini/Mac Pro/iMac Pro/iMac with excellent video quality. Then feel free to enjoy your favorite high definition Blu-ray movies on macOS High Sierra with QuickTime or transfer or stream Blu-ray movies for watching on iPad, iPhone or Apple TV.
 Free Trial ByteCopy for Mac

Useful Tips
- Backup DVD to QNAP TS-231P NAS on macOS High Sierra
- Best Blu-ray Ripper for macOS High sierra
- How to Get Blu-ray Playback on macOS High Sierra iMac/MacBook (Air/Pro)/Mac Mini/Mac Pro/iMac Pro?
- How to Copy Blu-ray on macOS High Sierra?
- Best Solution to Copy DVD to Hard Drive in lossless MKV on macOS High Sierra
- Top 5 Paid/Free OGMRip Alternatives for Mac (macOS High Sierra included)


