 Home
HomeThe following guide shows how to do lossless Blu-ray to MKV backup on Mac with all audio/subtitles tracks and chapters preserved. If you are looking for such a solution, just feel free to check it.
Required tools:
Pavtube ByteCopy for Mac
About Pavtube ByteCopy for Mac
Pavtube ByteCopy for Mac is specially developed for Mac users to create MKV files from recently released Blu-ray and DVD movies with lossless quality. By using this Mac tool, users are able to preserve all audio tracks/subs streams/chapter information in a single MKV file, and meanwhile keep videos in 1080p quality at original 16:9 aspect ratio, and audios in original HD quality (TrueHD audio, DTS-HD Master Audio…) without any quality loss. Pavtube ByteCopy for Mac is fully compatible with Mac OS X macOS Sierra, OS X El Capitan, Yosemite, etc so you don't worry the system compatibility issue.
Read Also: 3 ways for lossless Blu-ray backup: BD to BD, BD to ISO and BD to MKV
Step-by-step instruction: Lossless Blu-ray to MKV backup on Mac
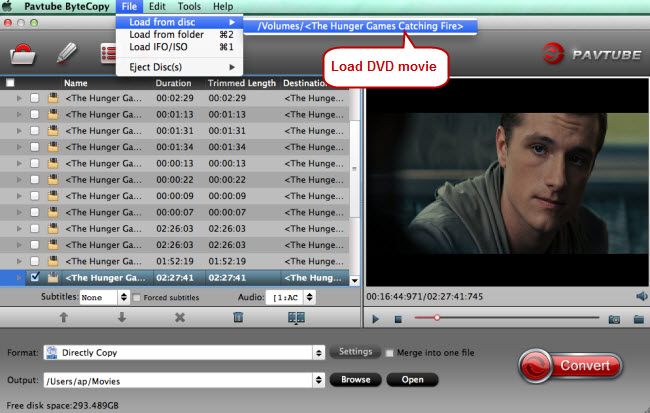
Step 1: Free download Pavtube ByteCopy for Mac, install and run it on your Mac computer. Connect the external BD drive to your Mac, and then insert the Blu-ray disc to the drive.
Launch Pavtube ByteCopy for Mac, and click “Load from Disc” icon in the top left corner of the main interface to load your Blu-ray movie from your external BD drive. After the loading process is done, you will see all titles in the BD movie are showing with main title checked by default only. If you wanna backup main title and all bonus features to MKV, you need to select all titles. If not, the software will backup the main title only.
Step 2: Click the format bar to follow “Multi-track Video” > “Lossless/encoded Multi-track MKV (*.mkv)” which well preserves chapter markers and multiple subtitles/audio tracks.
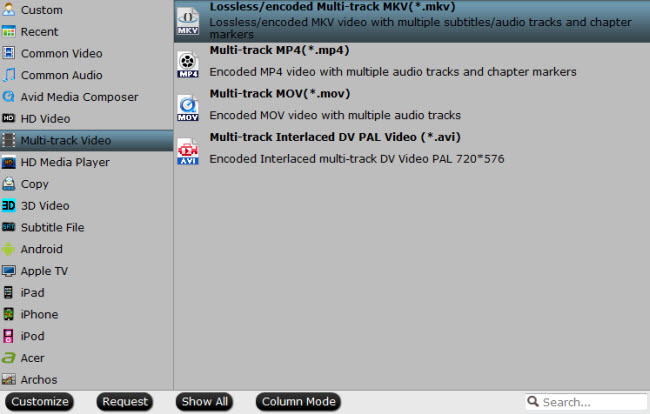
Tip: Here, you can click "Settings" to set your subtitle and audio. When you rip Blu-ray to lossless MKV, you are allowed to keep multiple subtitle and audio tracks. Just choose what subtitle you want and check the streaming.
You may also need: Copy all subtitle & audio tracks to H264 MKV | Add subtitles to MKV, burn MKV to DVD with subtitles
Step 3: Click “Browse” button to specify where to locate the output MKV files. Click “Convert” button to start lossless Blu-ray to MKV backup on Mac.
When the bluray backup on mac is finished by Pavtube ByteCopy for Mac, you can click “Open” button to get the final output MKV files with all audio/subtitles tracks and chapters preserved. Hope this helps.
More features of Pavtube ByteCopy for Mac
Backup BD/DVD to MKV on Mac with lossless quality/keep BD videos in 1080p quality at original 16:9 aspect ratio.
Allow full preservation of all audio tracks (like DTS HD Master Audio, Dolby TrueHD Audio, etc.), subs streams, and chapter markers.
Remove unwanted audio tracks/subtitles streams, and only keep the one(s) you need.
Keep soundtracks and subtitles in different languages, e.g. English, Spanish, French, Deutsch, Portugues, Japanese…
The output MKV files are compatible with lots of HD Media Players and Mac Players, like WD TV HD Media Player, Popcorn Hour C-200, VLC media player, MPlayer and more.
* Learn Make MKV and Play MKV solutions
 Free Trial ByteCopy for Mac

Useful Tips
- How to copy DVD and Blu-ray movie to your hard drive without quality loss?
- Make full copy of blu-ray disc in fastest and easiest way
- How to rip Blu-ray to MKV with DTS 5.1 for all audio streams?
- How to backup DVD and Blu-ray collections to home server?
- Make a backup of a Blu ray disc to hard disk without compression
- Back up commercial Blu-ray Discs


