 Home
Home“How do I burn mkv movies to DVD that are playable to any DVD player? I have got some MKV movies from friends and tried certain DVD burner, but after some tests, the sound is unclear or distorted. Further more, how do I add in the subtitle while burning? Because few of the software contain feature of add external subtitle files.”
Piled with videos and movies downloaded online or shared with friends and attend to save them in blank DVDs, while cannot understand a word the actors/actresses are saying? The first thought would be adding corresponding subtitles into movies. If you are facing same difficulty in adding external subtitles into MKV movie for DVD burning, Pavtube iMedia Converter for Mac and DVD Creator for Mac would be your choice of burning MKV movie to DVD as well as adding external subtitles to the movie.
Here is a brief guide about how to insert SRT/ASS/SSA subtitles to MKV for DVD burning
Part 1. Add downloaded subtitle files into MKV movie on Maverricks
Step 1. Download SRT/ASS/SSA subtitles for your MKV movie.
Many websites are available to get SRT/ASS/SSA subtitles for the latest and hottest popular movies as well as TV films. You could choose either website from below top 5 sites to download external subtitles for your movie.
1. Moviesubtitles.org
This site offers subtitles not only for the latest and hottest popular movies but also TV films. Subtitles on this site are in multiple languages and for DivX/Xvid movies and packed with WinZip. The common file format of these subtitles is srt.
2. subscene.com
This site provides numerous subtitles in different languages including French, English, Spanish and more.
3. download.hr/subtitles.html
You should register to become membership of this site to upload or download subtitles and downloaded subtitle files are packaged with WinZip, you need unzip it before adding into video.
4. subtitleonline.com
Subtitle files of more than 500 TV series and hot movies can be found on this site, and the subtitles provided are for DivX videos and DVDs in 11 different languages.
5. divxsubtitles.net
Multiple kinds of subtitles can be downloaded from this site, and you can easily add sub files into movies.
Step 2. Install Pavtube iMedia Converter for Mac.
This Pavtube Mac iMedia Converter application is a best combination of a Blu-ray ripper, a DVD ripper and a Video converter which allows you to backup BD/DVD Disc, rip BD/DVD Folder and IFO/ISO file as well as convert common videos such as .MP4, .MPEG, .AVI, .MKV, meanwhile it contains video editing functions so that you can trim, crop, split, merge, add watermark and attach external subtitles into source media.
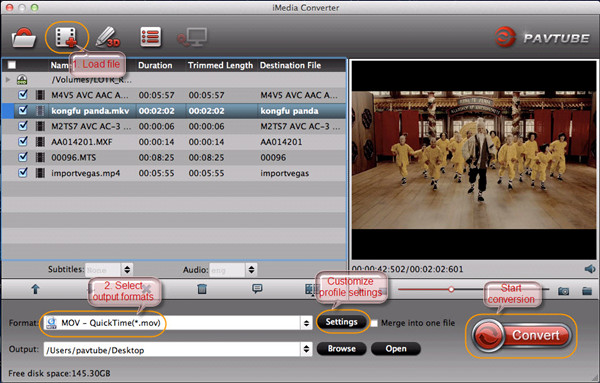
Step 3. Import MKV movie to Mac iMedia Converter.
Click “Add Video” icon to import your source file, or you could add the whole folder since Pavtube iMedia Converter for Mac supports bath processing facility.
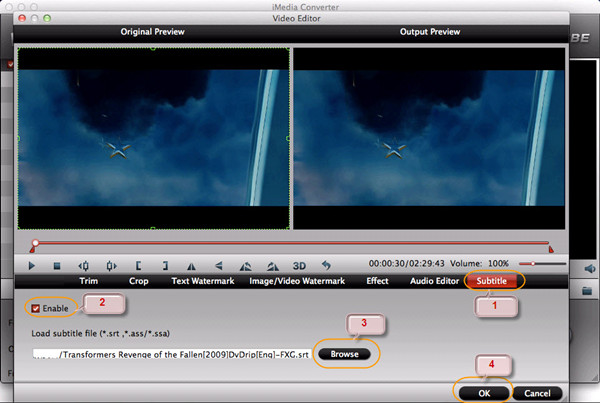
Step 3. Insert SRT/ASS/SSA subtitles to MKV movie.
Put your mouse on the MKV movie you just load, click “Video Editor” tab and switch to “Subtitles” option, now enable to add subtitle file and save your settings.
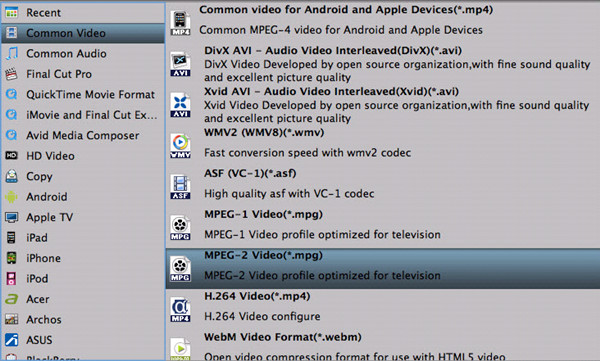
Step 4. Choose output format and start conversion.
Choose from “Format” list for this conversion. To get almost same video quality with original MKV file, you are suggested to select for output.
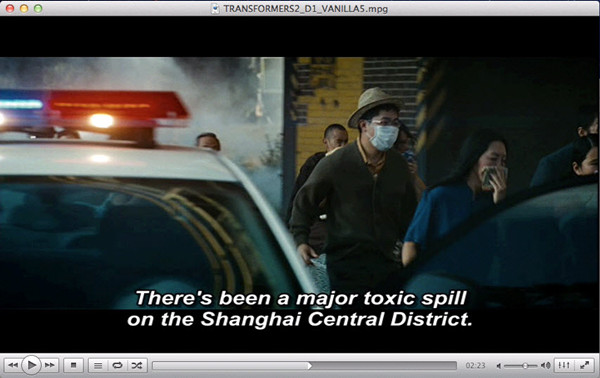
Now, click the big “Convert” button to add SRT/ASS/SSA subtitles to MKV movie. After a successful conversion, open output file path and locate the output MKV movie with subtitles included.
Part 2. Burn MKV movie with subtitles to DVD on Max OS X Mavericks
Step 1. Add MKV movie to the Mac DVD Burner App
Launch Pavtube DVD Creator for Mac, click “Import” tab to open the browser and load your source MKV movie. Or you can just drag & drop your source files in the program for burning.
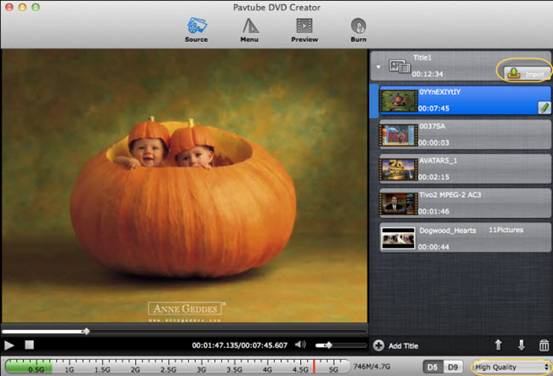
Tip: To create another Title, click the “Add Title” button and add more source videos. Please notice the size indicator at the bottom, if exceed the red line, you are suggested change to DVD9 or remove some videos.
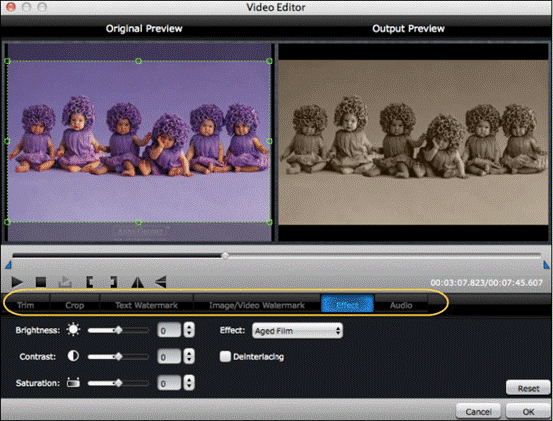
2. Edit MKV videos (Optional)
You are allowed to crop, trim, rotate, adjust the video effects and add watermakrs in Pavtube DVD Creator for Mac. Click the “Edit” tab and “Video Editor” window will pop up, and you can edit MKV movies in your own way.
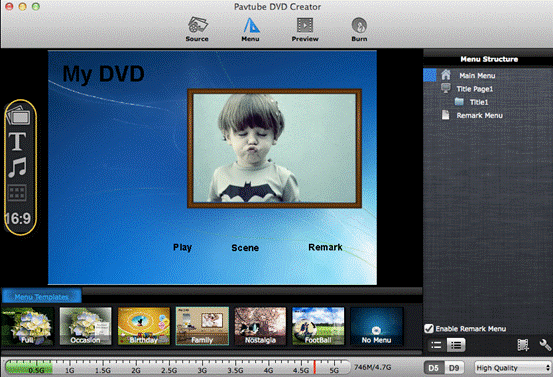
3. Customize DVD menu.
Pavtube DVD Creator for Mac helps users to personalize DVD menu, you can change the menu buttons, thumbnails, add background music, custom background image, etc.
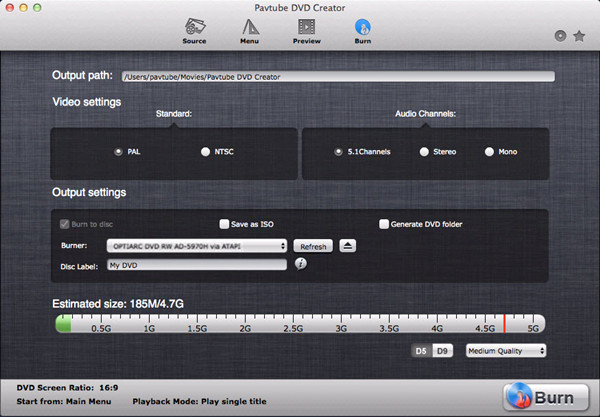
4. Start burning MKV with subtitles to DVD on Mac.
Switch to “Preview” tab and check if everything is perfect before burning MKV to DVD. Then go to “Burn” tab and adjust DVD settings like video standard (PAL or NTSC), audio channels (5.1 channels, Mono, Stereo), output settings, disc label, and DVD drive (please insert a blank DVD disc into your selected DVD writer). Now press “Burn” button and the Mac DVD authoring program will start creating DVD from MKV source files with subtitles included automatically.
 Free Trial iMedia Converter for Mac


