 Home
HomeiMovie is a good choice for video lovers to do simple editing job after shooting a loads of footage. You can resize and crop video in iMovie projects to remove undesirable parts or to get a close-up of a subject of interest. You can also use cropping to make image fit if you have video clips that don’t fit within your project’s aspect ratio. In case that there are videos you’ve taken with your camera held sideways, you can use rotating feature for reorienting images.
How to Resize, Crop, and Rotate Videos in iMovie 11? Follow these steps:
Part 1: How to Crop and Rotate Videos in iMovie 11
Part 2: How to Crop and Rotate Videos using iMovie Alternative
Part 1: How to Crop and Rotate Videos in iMovie 11
To crop a video clip:
1. In the Project browser, select a video clip, and then click the Crop button or press the C key.
![]()
Tips: If iMovie refused to accept your video files, you may consider using Pavtube iMedia Converter for Mac to convert videos to AIC before importing.
2. In the viewer, click Crop, and then drag to resize and reposition the green cropping rectangle to focus on the part of the image you want.
To resize the cropping rectangle, move the pointer to a corner of it until the pointer turns into a plus sign, and then drag.
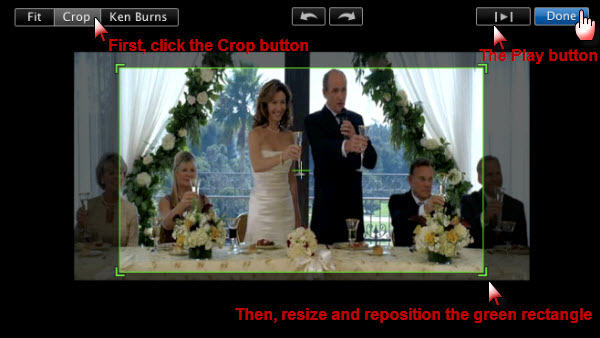
3. Click the Play button in the viewer to preview your work. When you’re satisfied with the crop, click Done.
To rotate a video:
1. In the Project browser, click a video clip in your project, and then press the C key or click the Crop button.
![]()
Kindly note: For video clips, a crop (or rotation) applies to the entire clip, even if you select just a part of the clip to modify.
2. Click the right or left rotation buttons at the top of the viewer.
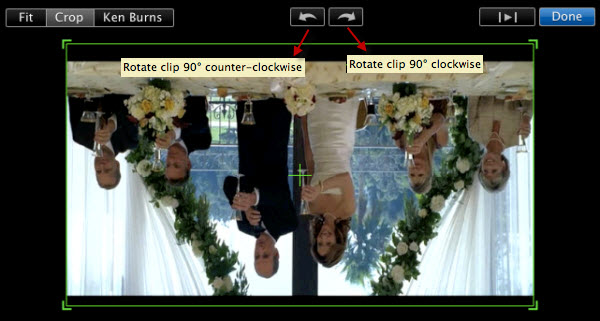
Left Arrow: Rotate clip 90 degrees counter-clockwise.
Right Arrow: Rotate clip 90 degrees clockwise.
With the new orientation, the image might no longer fit the project’s aspect ratio, and black bars might appear at the top and bottom of the image (letterbox) or on its left and right sides (pillarbox). In such a case, you can click Crop button in the upper-left corner of the viewer to crop the image so that it fits the aspect ratio.
3. Click the Play button in the upper-right corner of the viewer to preview the image. When you’re satisfied with the image, click Done.
Part 2: How to Crop and Rotate Videos using iMovie Alternative
You can use Pavtube iMedia Converter for Mac as an easy-to-use iMovie alternative to crop and rotate video clips.

Just follow the steps below to simply crop and rotate videos in iMedia Converter for Mac.
Crop a video clip:
1. Open up iMedia Converter for Mac program, directly drag and drop your video clips into it.
2. Check the video clip you want to crop, and then press the Edit button to enter Video Editor Panel.

3. Switch to "Crop" tab, and follow the below methods to crop selected video:
A. Crop video by dragging and dropping the green cropping rectangle
Adjust the green cropping rectangle by dragging its corners or edges to show the part of the image you want.

B. Crop video by setting values
There are "Simple Mode" and "Advanced Mode" under Crop feature. In "Simple Mode", you can customize values in the box of "Left", "Top" and "Crop Size" to make your crop decision.
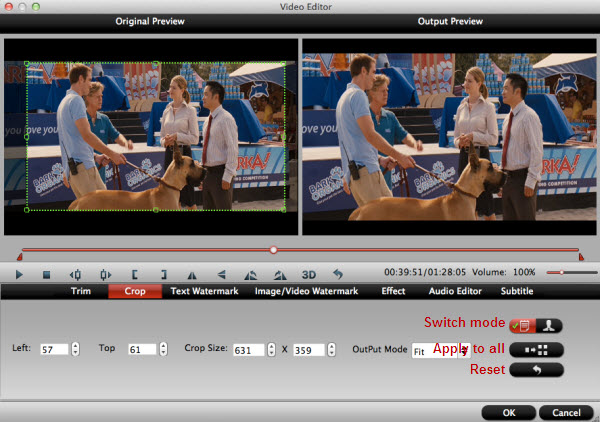
Under "Advanced Mode", there are four value fields: Left, Top, Width and Height. You can either type in specific values to the fields or adjust sliders to crop the source file.
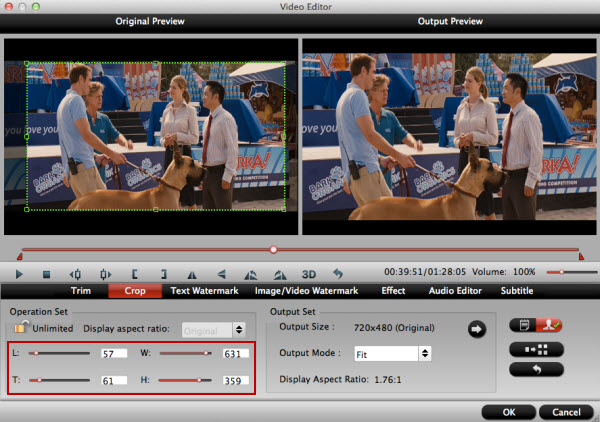
Keep original aspect ratio and cropped aspect ratio
To keep original aspect ratio, users need to make sure the "Display aspect ratio” and the "Size (pix)" in "Settings" option are all set as "Original". If you want to keep the cropped aspect ratio, Pavtube software offers several aspect ratios for you to choose from, including 16:10, 16:9, 5:4, 4:3, 3:2, and 2:1.
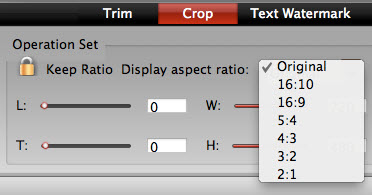
Once you selected a "Display aspect ratio", the "green cropping rectangle" will keep this ratio to crop video and you are able to preview the final effect in real time. If you want to keep the same aspect ratio in your final output files, do remember to set the Video "Size (pix)" in "Settings" section as the same ratio as display aspect ratio. For example, if you want to export a file with "16:9" aspect ratio, firstly, you choose "16:9" in "Display aspect ratio", and then go to "Settings" section to adjust the Video "Size(pix)" as 1280x720 or 1920x1080. After finished, click "OK" to confirm.

Rotate a video clip:
1. Open up iMedia Converter for Mac program, directly drag and drop your video clips into it.
2. Check the video clip you want to rotate, and then press the Edit button ![]() to enter Video Editor Panel.
to enter Video Editor Panel.
3. Press Flip or Rotate buttons on Video Editor Panel to rotate a video clip. There are four options to help you rotate a video.
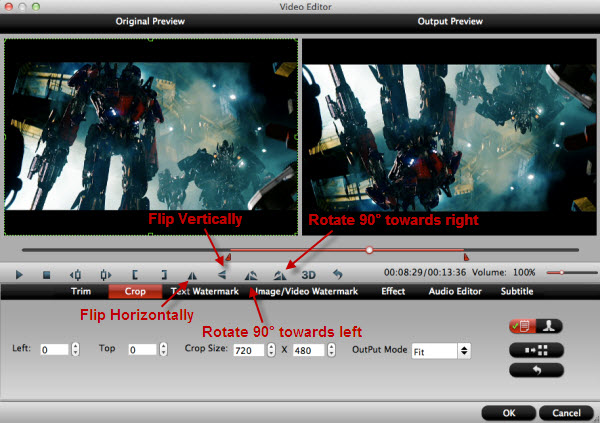
Flip Horizontally: Click to flip the image horizontally.
Flip Vertically: Click to flip the image vertically.
Rotate 90° towards left: Rotate clip 90 degrees counter-clockwise.
Rotate 90° towards right: Rotate clip 90 degrees clockwise.
When you’re satisfied with the image, click OK, and then go back to the main interface of iMedia Converter for Mac to press Convert button ![]() to start conversion. The cropping and rotating effects will be applied to the output files.
to start conversion. The cropping and rotating effects will be applied to the output files.
 Free Trial iMedia Converter for Mac

Useful Tips
- How to import FLV files to iMovie for editing?
- Transcode TiVo shows to AIC for editing with iMovie and Final Cut Express
- Repack Canon XA25 AVCHD to AIC MOV: the best supported format for iMovie and FCE
- How to Convert QuickTime file to iMovie?
- How to Resize, Crop, and Rotate Videos in iMovie (iMovie 11)
- Canon Rebel T5i/EOS 700D Review: Import T5i MOV to iMovie/FCE on Mac


