 Home
HomeSamsung's Chromebook Plus is the first of a new generation of Chromebooks running Chrome OS. It is one of a pair of Chromebooks from Samsung and the other is the Chromebook Pro. These Chromebooks are big deal because they are in the vanguard of the next phase of Chrome OS, one where it supports Android apps, works better on tablets, and accepts stylus input---all while having a full, desktop-class web browser and web apps. In our previous articles, we have disscussed how to watch Blu-ray and DVD on Chromebook Pro. For Chromebook Plus owners, you may also wanna to watch Blu-ray on Chromebook Plus wherever you go. The following part will show you how to get this work done.
How to Play Blu-ray on Chromebook Plus?
Similar as Chromebook Pro, Chromebook Plus doesn't has a built-in Blu-ray drive to read the data on Blu-ray disc.What's more, the playback of Blu-ray requires special decoding software and codecs to work, but Google has not licensed this software and included it with Chrome OS. So, you cannot watch Blu-ray on Chromebook Plus by default. If you want to play Blu-ray on Chromebook Plus, the only way is to rip Blu-ray to Chromebook Pro compatible file types. In fact, it is very easy to rip Blu-ray to Chromebook Plus supported media formats as long as you get a best Blu-ray ripper in hand.
When searching "Blu-ray ripper" in Google, you may find there is a large amount of Blu-ray ripping softwares available. If you have no idea about which one to use, we highly recommend Pavtube ByteCopy for you. We have tested several Blu-ray rippers on the market, and it is the most satisfying one. This Blu-ray ripper software can automatically and quickly remove all Blu-ray copy protection and region code without any help of other third-party application, which makes you get the chance to convert non-protected Blu-ray discs to Chromebook Plus compatible media formats and codec listed below.
Media Formats: .3gp, .avi, .mov, .mp4, .m4v, .m4a, .mp3, .mkv, .ogv, .ogm, .ogg, .oga, .webm, .wav
Codec:
| Container | Video codec | Audio codec |
| ogv | Theora | - |
| webm | VP8 | Opus |
| VP9 | Vorbis | |
| mp4 | H264 | - |
| MPEG4 | - | |
| mov | MPEG4 | - |
| H264 | - | |
| avi | MPEG4 | MP3 |
| Divx | MP3 | |
| XVID | MP3 | |
| 3gp | H264 | AAC |
| MPEG4 | AMR-NB |
Futhermore, with its buil-in video editor, you can flexibly adjust output file parameters including video codec, resolution, bit rate, frame rate, audio codec, bit rate, sample rate, channels, etc. to achieve better playback effects on Chromebook Plus. As we all know, Chromebook Plus utilizes a display screen aspect ratio of 3:2, while Blu-ray uses an aspect ratio of 16:9. When you try to play the Blu-ray movies with an aspect ratio of 16:9 on Chromebook Plus, there will be black bars around the video frame. Don't worry! Pavtube ByteCopy will give you an assistance to fix the incompatible aspect ratio issues between Blu-ray and Chromebook Plus.
For Mac users, just download its Mac version: Pavtube ByteCopy for Mac, to rip Blu-ray to Chromebook Plus playable media files.
How to Rip Blu-ray for Playback on Chromebook Plus?
Step 1: Load Blu-ray movies
Insert your Blu-ray disc into your Blu-ray Drive that connect to your PC or Mac. Click "File">"Load from disc" on the top left to load the Blu-ray movies you want to watch on Chromebook Plus. If you also have a collection of DVD discs, and wanna to play DVD on Chromebook Plus, this application also can help you.
Generally speaking, Blu-rays have multiple subtitles and audio tracks. If you don't want all streaming tracks, you can select your desired subtitles stream and audio track, and rip Blu-ray with forced subtitles.

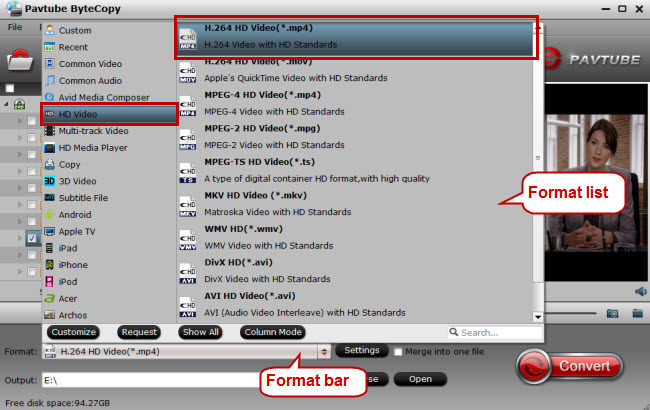
Step 2: Choose Output Format for Chromebook Plus
Click the "Format" bar, from its frop-down list, choose one of Chromebook Plus supported media formats such as "H.264 HD Video(*.mp4) from "HD Video" category. If you only want audio, you also can extract MP3 audio from Blu-ray using this program for Chromebook Plus playback.
Step 3: Adjust Video Aspect Ratio
Click "Edit" icon on the tool bar of main interface to open "Video Editor" Window. Go to the "Crop" tab, in the right panel of the program, click to switch to advanced mode. To change output video aspect ratio, there are several aspect ratios for you to choose from, including 16:10, 16:9, 5:4, 4:3, 3:2, and 2:1, you can choose Chromebook Plus accepted 3:2 aspect ratio. Once you select a "Display aspect ratio", the "green crop frame" will keep this ratio to crop video and you can preview the final effect in real time. If you want to keep the same aspect ratio in your final output files, do remember to set the Video "Size (pix)" in "Settings" section as the same ratio as display aspect ratio.

Tips: The pencil-like "Edit" button allows you to trim, crop, add watermarks, apply special video effects, edit audio tracks, and insert subtitles, etc.
Step 4: Watch Blu-ray on Chromebook Plus
Click "Browse" button to determine the destination folder you want to save the converted Blu-ray movie. And then hit the "Convert" button to realize Blu-ray to Chromebook Plus conversion. When the conversion process finishes, hit "open output folder" to find the generated Blu-ray movie and transfer it to your Chromebook Plus. Then you can watch Blu-ray on Chromebook Plus with ease.
By default, Chromebook Plus uses the built-in media player to play audio and video files. Just simply double-click the target Blu-ray movie file in Files app and now you can enjoy Blu-ray on Chromebook Plus offline! As now the VLC media player lands on Chromebooks, you can also download VLC from the Chrome Web Store and then watch Blu-ray on Chromebook Plus via VLC Media Player.
Related articles:
Watch Movie DVD on Chromebook Pro offline
 Free Trial ByteCopy


