 Home
HomeOn the weekend I was sitting down looking at my DVD collection and I suddenly came across an idea- Would it be feasible to rip my entire DVD collection to my 20TB Raid? Like most "weekend ideas", it sounded like a good idea at the time. No more risk of damage to my DVD discs, instant access to the media center and the ability to stream DVD movie to wherever I wanted it. However, backup DVD to 20TB raid is really a heavy transcoding task.
In order to successfully backup terrabytes of DVD video files, 20TB storage space of Raid is enough for me and the most vital is an efficient DVD ripper software to automatically complete the heavy task. Is there anyone also want to rip their entire DVD library? If so, I'd like to discuss how to backup DVD to 20TB Raid and give software recommendations for you.
Find the best DVD ripper first!
I tested several DVD rippers on the market to backup DVD to Raid. Finally, Pavtube ByteCopy edged out other competitors due to its strong ability to remove the encryption and other protection mechanism from DVD discs. And, it is the No.1 fast DVD ripping software I tested which can save your entire DVD library as back-ups to 20TB RAID network drive in high speed and quality. What's more, this DVD ripper offers a large range of output video formats to adapt to users' various media players and devices, including H.265/HEVC, M3U8, H.264/MPEG-4, MKV, MP4, AVI, WMV, FLV, MOV, VOB, etc.
Pavtube ByteCopy is not only a DVD ripper, but also a good Blu-ray ripper. So, if you want to backup both DVD and Blu-ray to 20TB Raid, this software is absolutely your first choice. More surprising feature is that it also provides a professional video editing package that allows you to create your own DVD movie to 20TB RAID by trimming, cropping, merging, etc. Mac version is here. The following how-to guide on Windows PC can be taken for reference:
Steps to backup DVD to 20TB RAID with the best DVD ripper
Preparations:
1. Download and install the best DVD ripper on your computer.
2. Confirm your DVD disc is intact.
3. Prepare a DVD drive.
Step 1: Import DVD disc
Run the best DVD ripper on your computer, click "File"> "Load from disc" to import your DVD disc. DVD Folder, DVD IFO File,DVD ISO Image File, Blu-ray Discs and Blu-ray Folder are also allowed to import to re-encode to Raid.
After importing, all titles in DVD movie will be listed in the program. The title with the longest duration contains the main movie will be automatically checked, which largely shrinks the size of final output movie and save more space for your RAID. If you desire to preserve other titles about commentary, menus, prevue and ads, just check these titles you need. At the bottom of chapter list, you can choose desired subtitle/audio track. Or you can keep forced subtitle to only show subtitles on display when actors are speaking foreign language.

Step 2: Specify output format
Pavtube ByteCopy offers you hundreds of formats in "Format" drop-down list. To some degree, RAID has no limitation to digital video formats since it is only a storage device. You should choose the output format according to your ultimate media playback devices.
Here we click the Format bar to select "H.264 HD Video(*.mp4)" output format for your 20TB RAID, which is a popular video format suitable for most media playback devices. If you have VR headset, such as Google Cardboard 2, VR Box , then "3D Video" > "MP4 Side-by-Side 3D Video (*.mp4)" or "MOV Side-by-Side 3D Video (*.mov)" is your best choice.

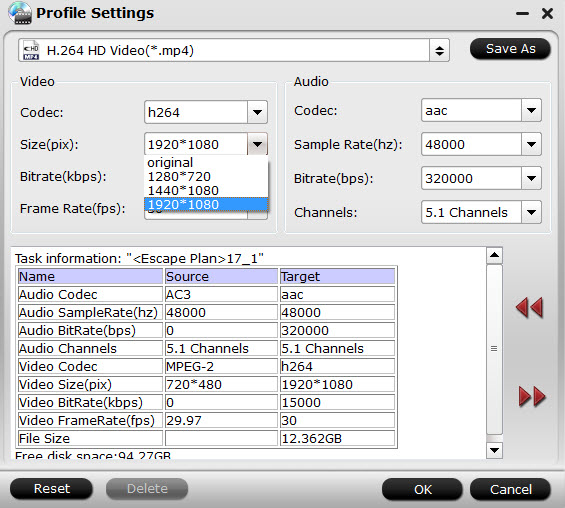
Step 3. Customize video and audio presets (optional)
Before backup DVD to 20TB Raid, the audio and video parameter can be adjusted to keep consistent with the devices specifications. You should check your device specifications on manual or official site, then click "Settings" button beside "Format" to open "Profile Settings" window to reset the video resolution, bitrate, fame rate, codec and audio codec, channel, bitrate, etc.
Step 4: Start Backup DVD to 20TB Raid
Back to ByteCopy main UI, hit on the "Convert" icon and start ripping DVD to H.264 HD MP4. When the conversion completes, open output folder and find the ripped DVD movie with high quality here.
Now you can connect your Raid and copy the converted DVD files via USB cable. Okay, just enjoy wondeful DVD films on portable devices via your Raid.
Further Reading: What is RAID?
RAID (redundant array of independent disks, originally redundant array of inexpensive disks) is a way of storing the same data in different places on multiple hard disks to protect data in the case of a drive failure. RAID works by placing data on multiple disks and allowing input/output (I/O) operations to overlap in a balanced way, improving performance.
Perfect performance, resiliency and low cost are among the major benefits of RAID. By putting multiple hard drives together, RAID can improve on the work of a single hard drive and, depending on how it is configured, can increase computer speed and reliability after a crash.
 Free Trial ByteCopy


