 Home
HomeMy brother has a lot of Blu-rays and his room is crowed with discs, even there is no place to sit down. Eventually, he came to the conclusion that he would like the space back so he need to rip Blu-ray to NAS, Cloud server or some external hard drive to allow him to store his Blu-ray collection in the loft. I suggest him to store Blu-rays to 20TB Raid, which provides ample storage space for a large amount of Blu-rays. If you have similar problem with my brother, this solution is also suitable and useful for you.
Why I suggest my brother to store his Blu-ray to 20TB RAID? There are many advantages of this solution. With all Blu-ray copied to 20TB RAID, you will never worry about the expensive and fragile Blu-ray discs being broken, damaged or even stolen. What's more, you can stream the copied Blu-ray movies to multifarious media players and devices for playback, no specific Blu-ray player required. Also, we all know that the Blu-ray discs you bought contain various copy protection and region codes, and after ripping them to RAID, you can enjoy Blu-ray movies at will. Now you've konw the advantages of storing Blu-ray to RAID, would you like to backup your Blu-ray collection to 20TB RAID too?
Let's start store Blu-rays to 20TB RAID here!
Once you decide to backup Blu-ray to 20TB RAID, the first step you need to do is to find a professional Blu-ray ripper. An excellent Blu-ray Ripper has the ability of remove the encryption and other protection mechanism from Blu-ray and shift format. Here, we strongly recommond the Pavtube iMedia Converter for Mac to help you backup Blu-ray to 20TB RAID on macOS 10.13, macOS Sierra and other macOS operating systems. It can transcode Blu-ray to MP4, MOV, MPG, MKV, WMV, AVI, etc. to RAID for playing on TV-Set/iPad/iPhone/Android phones/tablets and other devices without using the Blu-ray discs and Blu-ray player. While offering users the ultra fast Blu-ray ripping speed, it also keeps the original video quality.
Futhermore, this Blu-ray ripper can creat 3D movies from 2D Blu-ray with abundant 3D effects, or convert 3D Blu-ray to 3D MKV, 3D MP4, 3D AVI, 3D WMV, etc. for various 3D TV and players. Pavtube iMedia Converter for Mac is more than just a Blu-ray ripper and it also provides a professional video editing package that allows you to create your own videos to 20TB RAID. Windows version is here. Once you get the best Blu-ray ripper for RAID, the following how-to guide on Mac can be taken for reference.
Guide on backup Blu-ray to RAID for storage and viewing
Preparations:
1. Download and install the Blu-ray ripper on your computer.
2. Confirm your Blu-ray disc is intact.
Step 1: Load Blu-ray disc
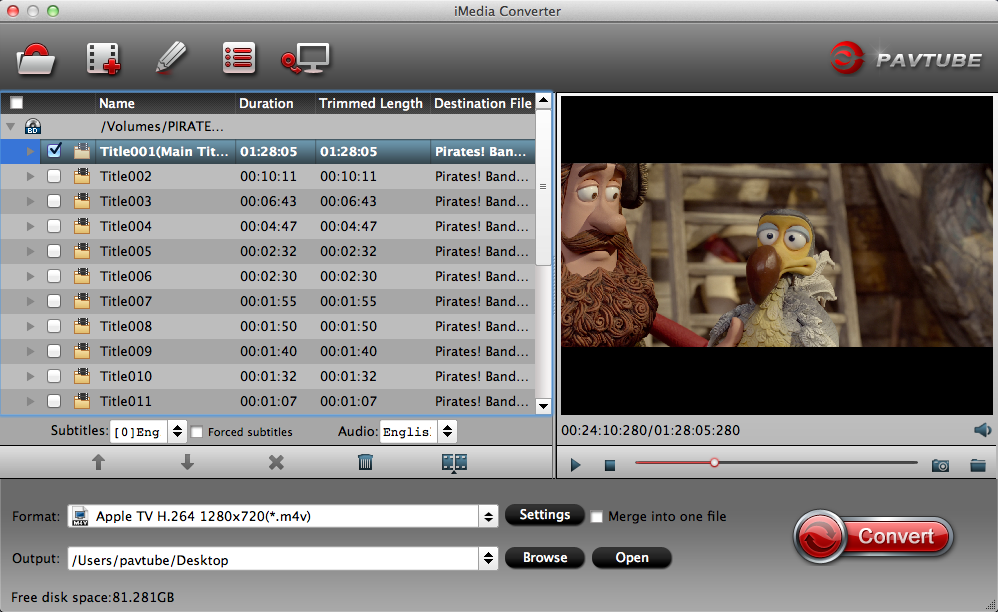
Run the Blu-ray to RAID ripper, click the Disc icon on the menu bar to import your Blu-ray movie. Blu-ray Folder, Blu-ray ISO Image File, DVD disc, DVD Folder, DVD IFO File and DVD ISO Image File are also allowed to import to re-encode to 20TB Raid.
After importing, all video files will be listed in the program. The title with the longest duration contains the main movie will be automatically checked, which largely shrinks the size of final output movie and save more space for RAID to store more movies. If you desire to preserve other titles about commentary, menus, prevue and ads, just check these titles you need. At the bottom of chapter list, you can choose desired subtitle/audio track. Or you can keep forced subtitle to only show subtitles on display when actors are saying a foreign language.
Step 2: Specify output format
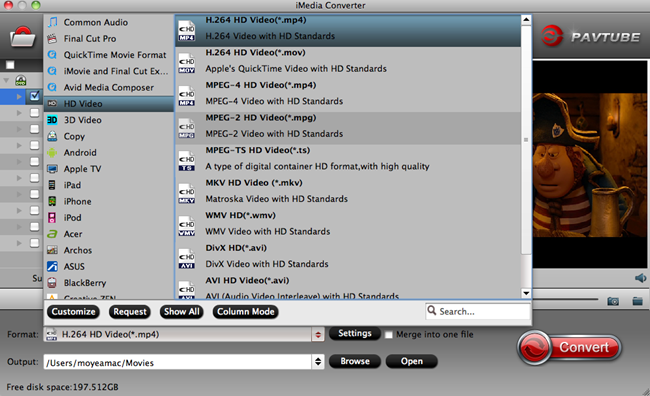
Pavtube iMedia Converter for Mac offers you hundreds of formats in "Format" drop-down list. To some degree, RAID has no limitation to digital video formats since it is only a storage device. You should choose the output format depend on your ultimate media playback devices.
Here we click the Format bar to select "H.264 HD Video(*.mp4)" output format for your 20TB RAID, which is a popular video format suitable for most media playback devices. H.265/HEVC files can also be selected in this Blu-ray ripper.
When you multimedia players are new iPad (2017), iPad Air 2/Air 3, iPad Mini 4, etc. You can click the output format bar to choose "iPad" > "iPad Air Full HD Video (*.mp4)." or other iPad preset. If you have VR headset, such as Google Daydream VR, PS VR, Homido VR, HTC Vive, Zeiss VR One, "3D Video" > "MP4 Side-by-Side 3D Video (*.mp4)" or "MOV Side-by-Side 3D Video (*.mov)" is the best choice.
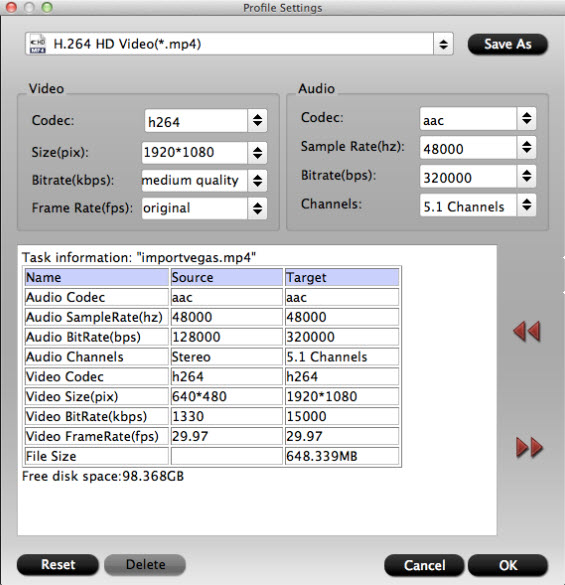
Note: To get better video playback on your devices, the audio/video parameter can be adjusted to keep consistent with the devices specifications. You should check your device specifications on manual or official site, then click "Settings" to reset the video resolution, bitrate, fame rate, codec and audio codec, channel, bitrate, etc.
Step 3: Convert Blu-ray movies to 20TB RAID
After all necessary settings, you can just click the “Convert” button to start converting your Blu-ray movies. After the conversion, click "Open output folder" to get the output files for your RAID. Now you can connect your RAID and copy the converted Blu-ray files via USB cable.
After you successfully store Blu-rays to 20TB RAID, you can store your Blu-ray collection in the loft and then get more space in your room. With all Blu-ray movies copied to RAID, you can easily bulid your own digital home theatre and enjoy the ripped Blu-ray movies on various media playback devices. Or copy the ripped Blu-ray movie into a blank Blu-ray disc as a gift to intimate friend or relative. Just enjoy the pleasure this Blu-ray ripper brings to you!
 Free Trial iMedia Converter for Mac

Useful Tips
- Mac OS X Computers & Apple Software Supported Video Formats
- Best Format Factory Alternative for Mac OS X (macOS High Sierra)
- Best 5 VR Video Converter for VR Headsets on macOS High Sierra
- Best Flip4Mac Alternative for macOS High Sierra
- Top 5 H.265/HEVC Player to Play HEVC Videos on macOS High Sierra
- Get Best 3 Recommend of DVD to MKV Rippers for MacOS High Sierra


