Home
HomeWindows Media Center, with short form of WMC, is a digital video recorder and media player developed by Microsoft. With it, your PC becomes a powerful TV, bringing your shows and entertainment to one place. While enjoying broadcast and Internet TV on PC with ease, have you ever thought of adding your Blu-ray movie collections to Windows Media Center Library for playback? Surely BD Player is your first choice, but there’re other ways to go with when building up a home theater system. With Blu-ray Ripper software and a internal or external BD drive, you can easily rip Blu-ray movies to Windows Media Player friendly format and watch Blu-ray movies via Windows Media Center on HDTV via HDMI cable.
Why Rip Blu-ray to Windows Media Center?
Why bother ripping Blu-ray to Windows Media Center while you have already own a BD Player or PS4? Firstly, Blu-ray Discs are easy to break, but a digital copy is safe and permanent, even if the data get lost, there’re ways to recover. Secondly, ripping Blu-ray to Windows Media Center will protect your Blu-ray Discs from scratches – will you still hunt for a movie in hundreds of DVDs and BDs while you can easily search and play it with a remote control? Thirdly, ripping Blu-ray to WMP solves the problem of BD region code restriction. Commercial Blu-ray Discs could be Region A, B and C, and not a BD player will read full region Blu-ray Discs. Things happen that your BD player refuse to read the BD you BD purchased from oversea market (unauthorized region). After ripping BD to WMC, the movie clips you get is unprotected HD videos, which are acceptable for all media players as long as the codec is supported. (Different Ways to Remove Blu-ray Copy Protections)
All right, are you ready to put Blu-ray movie collection to Windows Media Center? If yes, follow the easy workflow below to convert Blu-ray movies to WMC optimized videos:
Ripping Blu-Ray Discs with Pavtube BDMagic
Before we start, make sure you have a BD drive and Pavtube BDMagic. Pavtube BDMagic can strip all copy protection of commercial Blu-ray discs, and convert the movie files of Blu-ray to whatever format you need. And the software lets you tweak just about everything after you've got the movie from disc. Plus, it also provides preset profiles for those who intend to watch the movie on a handheld gadget. Some of you may be using a Mac computer, please visit Pavtube BDMagic for Mac.
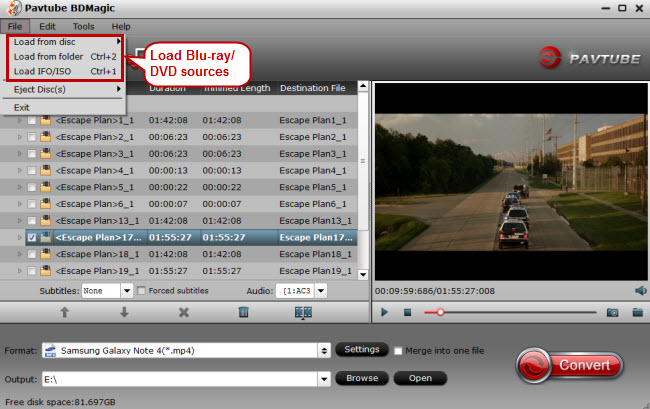
Step 1. Load Blu-ray Disc
Insert your Blu-ray disc to your blu-ray drive. Once you run the Blu-ray Ripper, click "File">"Load from disc" to add Blu-ray movie from BD drive. If you already have a Blu-ray folder or a Blu-ray ISO image file on your HDD, you can either click "Load from folder" icon or "Load IFO/ISO" icon to load your source files.
Step 2. Select an output format for Windows Media Center/ Windows Media Player
Click on “Format” bar and to select an output video format supported by WMC/ WMP. Here you are recommended to follow “HD Video”>> “DivX HD (*.avi)” or WMV HD (*.wmv)”. The former is widely supported by DVD players and HD media players. Both create 1920*1080 HD video clips of 16:9 for HDTV entertaining.

Step 3. Start ripping Blu-ray Movies to WMC optimized videos
Click “Convert” button to rip your Blu-ray movies to Windows Media Center/ Windows Media Player friendly format.
Tip: This software supports CUDA Acceleration, which will contribute to speed up the conversion. Find "Option" button on the interface to get "Acceleration" option, then Enable GPU Acceleration to get a faster conversion.
Step 4. Add Blu-ray movies to Windows Media Center
Once the conversion task is completed, you can click “Open” button to get the final output files. Open Windows Media Center and then add converted Blu-ray movies to Windows Media Center.(Play MKV Blu-ray ripping in Windows Media Center)

Tips for ripping BD/ DVD movies to Windows Media Center/ Windows Media Player:
Select desired subtitles and audio track: Click the drop-down list of “Subtitle”, then all the subtitle info in the Blu-ray will be displayed for you to select. To select your desired audio track, just click the pull down menu of “Audio”, and then the popup drop-down list will give you the detailed information of all audio tracks, including language, audio codec, and stream ID.
Join BD/ DVD chapters into one: If you would like to rip the whole movie into one file, select all the Titles and check the box “Merge into one file”.
Maintain 5.1 surround sound: Click “Settings” and select “5.1 channels” in the drop-down list of Audio Channels.
Keep audio and video sync: To get perfect A/ V synchronization, you need pay attention to frame rate when ripping BD/ DVD movies to Windows Media Center. You can click on “Settings” and try with different frame rate, like 30fps, 29.97 fps, 25fps, 24fps, etc. “Original” is not recommended.
Set auto shutdown: Once “Convert” button is clicked, ViewLog pops up. You may check "Shut down computer after conversion" in the ViewLog before conversion starts.
 Free Trial BDMagic