 Home
HomeBeginners may find that Final Cut Pro is very picky in importing videos, for example, one can import AVCHD files using camera import, but can't import them by selecting the .mts clips. This article is trying to explain why FCP 7 does not read your AVCHD contents properly and guide you through AVCHD import problems with Final Cut Pro 7/6.
Part 1. Knowing How FCP Work with AVCHD Video
Part 2. Log & Transfer - Ingesting AVCHD footage from Camcorder
Part 3. Log & Transfer - Ingesting AVCHD Archive from Mac HDD
Part 4. Troubleshooting with AVHCD Importing Problems
Part 5. Final Cut Pro - Working with Individual .mts/.m2ts Videos
Knowing How FCP Work with AVCHD Video
![]()
Final Cut Pro 7 (and any previous version) does not have native editing support for AVCHD footage. When working with AVCHD recordings in Final Cut Pro, the first thing you need to do is ingesting AVCHD in the Log and Transfer window, where you transcode H.264/AVC to an Apple ProRes codec or the Apple Intermediate Codec, both are natively supported by Final Cut Pro. The Apple ProRes format is recommended as best choice since it provides a more effective workflow in FCP 6, FCP7 and the refreshed FCP X. Find below a step-by-step tutorial on how to ingest AVCHD formatted footage through FCP 7/FCP 6.
Log & Transfer - Ingesting AVCHD footage from Camcorder
1. Connect your AVCHD camcorder to Mac via USB connection.
-> The camcorder shows up as a drive on the desktop. Keep in mind that your camcorder must be turned on, or your Mac will not recognize the device.
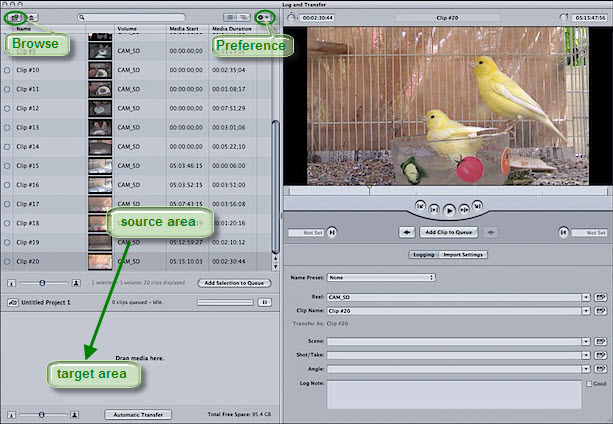
2. Launch Final Cut Pro 7/FCP 6, choose File > Log and Transfer.
-> The Log and Transfer window pops up and starts ingesting AVCHD folder structure from your camcorder (or the memory card that is plugged into the system). When it finishes, all the AVCHD clips are displayed in the browse area.
![]()
3. Choose Preferences from the Action pop-up menu in the upper-right corner of the Browse area.
-> A dialog appears as it shows below:
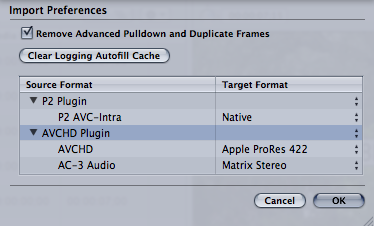
4. Find the built-in AVCHD Plug-in and choose Apple ProRes 422 as its Target Format/Transcode to preference, then click OK.
5. Back to the L&T window and decide which AVCHD clips to edit, and drag them to the Transfer Queue area (where it marks Drag media here). Preview them in the media player if you can’t tell which clips are the ones you’d like to import.
-> The L&T starts transcoding selected AVCHD clips to Apple ProRes codec.
The status column will show a swirl to indicate that clip is processing. Since the processing takes possibly twice as long as the duration of each clip, you can drink some coffee when it encoding AVCHD to Apple ProRes. Converted footage will be automatically added to your project, from where you can easily drag the clips to timeline for native editing and post-production.
Log & Transfer - Ingesting AVCHD Archive from Mac HDD
While L&T is capable of ingesting AVCHD clips from camcorder, experienced FCP users would backup AVCHD file structure (instead of single .mts/.m2ts files) to HDD and import AVCHD from local hard drive. People have good reasons to do so- it is always easier to take an USB stick than a camcorder and when ingesting AVCHD form camcorder you can’t tell if you would need a battery recharge before the rendering process completes.
Importing AVCHD from HDD is not so different with ingesting AVCHD from camcorder:
1. Launch Final Cut Pro 7/FCP 6, open Log and Transfer window with shortcut key Commad-Shift-8.
2. Set Apple ProRes 422 as target format in Preference.
3. Press the Add Volume button ![]() on the upper left corner, browse to and choose AVCHD folder, and the Log and Transfer window will import all AVCHD clips to it. Do not choose single .mts file.
on the upper left corner, browse to and choose AVCHD folder, and the Log and Transfer window will import all AVCHD clips to it. Do not choose single .mts file.
![]()
4. Choose the clips you’d like to render and drag them to Transfer Queue area (target area).
5. Wait until it completes converting AVCHD to Apple ProRes format, and then you can close L&T and find rendered clips in current project.
Troubleshooting with AVHCD Importing Problems
Q: My AVCHD camera (camcorder) is not showing up as a hard drive Mac…
A: Make sure your cam is turned on and in well connection with Mac. Connect AVCHD camcorders to Mac computer via USB 2.0, not FireWire. Use an Intel-based Mac computer, since AVCHD support is available only on Intel-based computers. Keep in mind that DVD-based AVCHD camcorders are not supported in Mac OS X Server v10.4 or earlier.
Q: Log and Transfer is not recognizing my AVCHD camera (camcorder)…
A: There are cameras and camcorders that are not compatible with FCP 7. Check if your AVCHD camcorder is on the list of Final Cut Pro Supported Cameras if Log and Transfer does not ingest AVCHD videos from camcorder. Both Sony and Panasonic have developed plug-ins to help users with some cams. Or you may use third party software to convert AVCHD to ProRes video.
- AVCHD Plug-ins: Sony AVCHD Plug-in for FCP7/FCP6 Download
Panasonic AVCCAM Importer for Final Cut Pro 7 Download
- Third-party encoder: Pavtube Video Converter for Mac ($35)
Q: My clips appear in the Log and Transfer window, but some of them can’t be rendered….
A: Only AVCHD footage can be ingested through the Log and Transfer process. Other formats and variants are not supported. It means SD video recorded with AVCHD camcorders can’t be accessed in the Log and Transfer window. AVCHD footage shoot at 1080/50p (or 1080/60p) and AVCHD Lite videos can’t be rendered by L&T because these are none standard AVCHD format.
You’ll have to third party encoder like Pavtube Video Converter for Mac to convert them into Prores video with acceptable frame rate.
- Cameras that shoot AVCHD Lite--- Panasonic Lumix line cameras, such as DMC-LX5, ZS7, TZ7, LUX5, FZ35/38, G2 and any other cameras that records 720p HD video in AVCHD Lite mode.
- Camcorders that records at 1080/50p(60p)--- Panasonic HDC-TM700, TM900, Sony HDR-CX360, CX-560, CX-580, Sony Alpha 57 (camera), etc
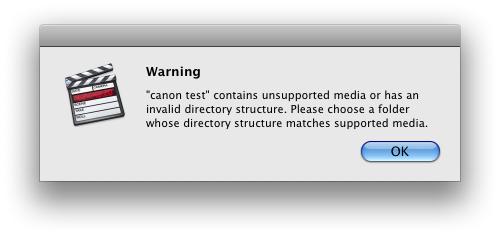
Q: When I try to Log and Transfer I am confronted with a warning that reads "Invalid directory structure."…
A: The correct way to backup AVCHD is copying the entire AVCHD folder with all directories and files to your Mac HDD. The AVCHD folder structure and all of its files must stay intact. If not, the video editing program will throw an error message when trying to import. You can try importing AVCHD from camcorder, or getting an AVCHD to Apple ProRes decoder that reads single .mts files, for instance, above mentioned Pavtube Pavtube Video Converter for Mac.
Q: My Cam shoots AVCHD with Dolby Digital 5.1 sound, but I’m losing surround sound after rendering in L&T…
A: When you choose to transfer AVCHD audio in the Logging area, audio is automatically mixed down to stereo. This is a restriction of L&T when working with AVCHD.
Final Cut Pro - Working with Individual .mts/.m2ts Videos
Many of us only copy the .mts/.m2ts files to Mac hard drives without knowing that Final Cut Pro doesn’t work with individual .mts/.m2ts files unless the AVCHD file structure is preserved from the camera archive. If you’d like to import single .mts file to Final Cut Pro 7/6, here’s the way to go.
1. Convert MTS to Apple ProRes with third-party AVCHD encoder. Converted videos should be saved in .mov format so that FCP could read them.
-> [Step-by-step Guide] How to Convert MTS to Apple ProRes 422 Codec for FCP importing
2. Launch Final Cut Pro 7/FCP 6, choose File>> Import >> Files…, and browse to where you save the converted AVCHD clips to. Choose the videos that you’d like to add.

3. Apple ProRes encoded videos should be added instantly to FCP project. No rendering is required. Just drag the clips to timeline for editing.
 Free Trial Video Converter for Mac

Useful Tips
- Best 5 TS Video Converter for macOS Sierra
- How to import AVCHD/MTS/MKV/AVI/MXF to Apple Aperture 3 on Mac
- Convert Humax recording 1080p videos to FCP and burn TS/MTS to DVD on Mac
- Panasonic Lumix DMC-GH3 Review: Transcode GH3 AVCHD to ProRes 422 for FCP (X)
- Burning AVCHD to DVD--how to convert and burn AVCHD(.mts) to playable DVD on Mac
- Convert Panasonic HC-X900, HC-X900M AVCHD 3D MTS on Mountain Lion


