 Home
HomeSony introduced the Handycam® NEX-VG900 for video makers to embrace the limitless expressive power of full-frame imaging. Sony VG900 is the first 35mm Interchangeable Lens Full-Frame Handycam camcorder, featuring 24.3 effective megapixel Exmor full-frame CMOS sensor and Full HD 60p/24p (NTSC) 50p/25p/24p (PAL) progressive movie recording capability. According to Sony, beautiful, film-like results can be achieved by shooting video in 25p/24p progressive mode. AVCHD version 2.0 standard 50p/60p recording is additionally supported, maximizing the range of creative options for movie-makers to explore. However, it’s not an easy thing for users to figure out the correct workflow to edit the HD videos shooting by VG900. See a user question:
“Hello guys, I shot with a Sony NEX-VG900 camcorder and I’d like to import its AVCHD footage into Final Cut Pro X for editing use. The VG900 camera was not mine and I did not have easy access to it. I googled for a solution, many people suggested to decode the AVCHD footage to Apple ProRes codec. I tried it, but the converter app I used on my MacBook Pro did not work at all. It refused to convert my large 1080p60 materials. Any hints on an available Mac converter? I don’t want to loose much quality in the conversion process. Thanks in advance.”
Pavtube MTS/M2TS Converter for Mac is an ideal tool to do conversion of Sony VG900 AVCHD files. It exports optimal Apple ProRes files for editing within Final Cut Pro, including Apple ProRes 4444, Apple ProRes 422 (HQ), Apple ProRes 422, Apple ProRes 422 (LT), and Apple ProRes 422 (Proxy). To have a good balance between the generated file size and image quality, the Apple ProRes 422 codec is the best choice. In the following guide, we will demonstrate how to encode Sony VG900 AVCHD to FCP preferred ProRes 422 codec to make your gorgeous masterpieces.
![]() Sony VG900 MTS to ProRes 422 Conversion Procedure
Sony VG900 MTS to ProRes 422 Conversion Procedure
1. Add source materials
Start up Pavtube MTS Converter as the best Sony VG900 AVCHD to FCP Converter. Click “Add video” or “Add from folder” button to browse and load your source AVCHD files taken with NEX-VG900.
2. Select target format
Hit the Format menu and choose “Apple ProRes 422 (*.mov)” as output format from the “Final Cut Pro” column.

3. Start rewrapping VG900 AVCHD to Apple ProRes 422
Click “Convert” button to start Sony VG900 MTS to ProRes 422 Conversion. As soon as the conversion is done, you can get the generated ProRes 422 MOV files via clicking “Open” button effortlessly.
![]() How to transfer converted Sony VG900 AVCHD files to Final Cut Pro (X)?
How to transfer converted Sony VG900 AVCHD files to Final Cut Pro (X)?
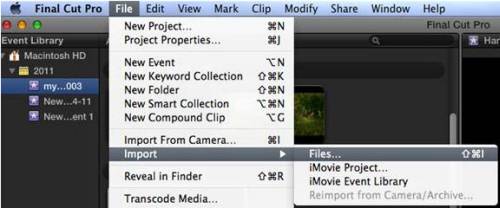
- To import transcoded VG900 AVCHD videos to Final Cut Pro X, do as the follow:
From File menu > Import > Files…
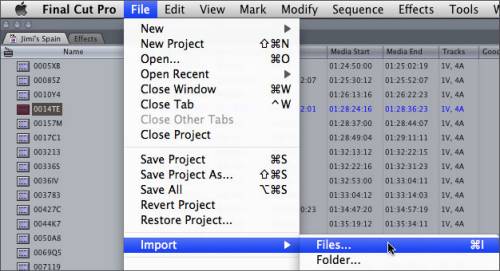
- To load re-wrapped Sony NEX-VG900 MTS files into Final Cut Pro 6/7, do as the follow:
From File menu > Import > Files…
More Related Information (Burn AVCHD to DVD on Mac)
If you intend to burn Sony NEX-VG900 AVCHD footage onto a blank DVD disc on your Mac-based computer, or author them to an ISO image or a DVD folder for storage on your HDD, Pavtube DVD Creator for Mac is what you need. Besides producing DVDs from AVCHD MTS/M2TS clips, this Mac DVD authoring software can also create high quality DVDs from many other files types, such as P2 MXF, Canon/Sony MXF, TiVo, AVI, MKV, MOV, DivX, XviD, MP4 as well as still images (creating slideshow DVDs). Best of all, it now has a half-price Halloween sale, only $17.5, you can bring this Mac DVD Creator home.

 Free Trial MTS/M2TS Converter for Mac

Useful Tips
- How to burn Final Cut Pro projects to DVD on Mac?
- DVD to Final Cut - How to rip DVD to edit in FCP, FCP X, FCE on Mac?
- Enable Final Cut Pro 6/7 and FCP X to work with NEX-6 50p/60p MTS clips
- Canon C500 MXF Footage and Final Cut Pro (X) workflow - C500 MXF transcoding to ProRes 422
- Using P2 AVC-Intra 50/AVC-Intra 100 MXF footage with Final Cut Pro
- Canon C100 and FCP workflow - how can I edit Canon C100 AVCHD with FCP (X)?


