Home
HomeSony Vegas Pro is well known as a powerful, yet beginner-friendly video editing program. People can use it to create personal production to post onto YouTube for sharing. You can import media from multiple devices (including HD video) but it is a pity that you can't import DVD to Sony Vegas Pro for re-production cause that Sony Vegas Pro can't accept DVD videos to edit.
The only way to edit DVD in Sony Vegas Pro is to extract clips from DVD and save it as Sony Vegas Pro supported video format. Fortunately, it is a easy job with a easy-to-use DVD Ripper. Here, let's show you how to extract DVD to Sony Vegas Pro compatible video and import the DVD rips to Sony Vegas Pro for editing.
How to Rip DVD to Sony Vegas Pro for Editing?
Pavtube BDMagic for Windows and the equivalent Pavtube BDMagic for Mac are application designed to remove DVD copy protection and shift DVD format to Sony Vegas Pro 14/13/12/11 editable MPEG-1, MPEG-2, MOV, WMV, H.264, etc. Thus, you can tinker with options for video and audio video size, aspect ratio, encoder, and frame rate, audio sample, channel mode and volume for get better footage for Sony Vegas Pro editing. Furthermore, it is possible to crop black bands, trim video length, add subtitles, replace/mute audio, add watermakr.
Besides DVD, Pavtube BDMagic also can convert DVD ISO, Blu-ray disc, DVD Video-TS folder, Blu-ray folder to Sony Vegas Pro 14/13/12/11 friendly format for editing. The tool is packed in a clean and intuitive interface. Importing DVD video can be done by using only the folder view and the "drag and drop" method is also supported.
Rip DVD to Sony Vegas Pro 14/13/12/11 Easily
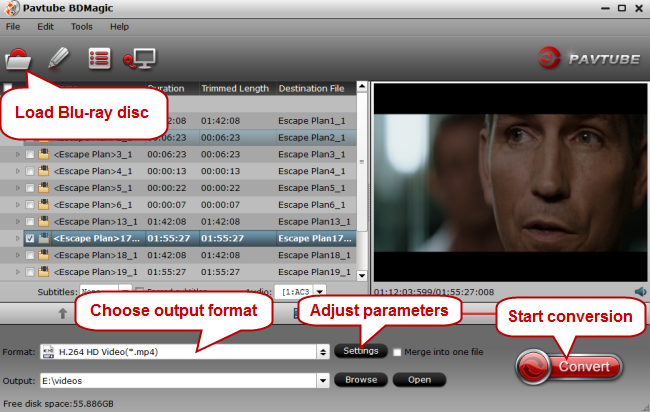
Step 1. Load DVD movies
Launch the DVD to Sony Vegas Pro converter. Insert the DVD disc into your DVD drive and drag the disc icon from the desktop to the program to load the DVD files. Alternatively, you can click File > Load DVD to locate and add the DVD movies you want to convert.
Similar Search: MP4 to Sony Vegas Pro | 4K to Sony Vegas Pro | DivX/XviD to Sony Vegas Pro
Step 2. Choose Sony Vegas Pro supported format
Click "Format" option to choose the output format. To make your Sony Vegas Pro 14/13/12 to readthe output files, just choose the most Sony Vegas accepted "WMV (VC-1) (*.wmv)" or MPEG-2 under "Adobe Premiere/Sony Vegas" option as output format. Since Sony Vegas Pro also accept HEVC codec video, which offer the same video quality with smaller size comapring to H.264 codec video. So you also can choose H.265 MP4 here for Sony Vegas Pro 14.

Tips:
a. If the default settings do not fit your needs, you can click "Settings" button to customize output video parameters like bitrate, channels, frame rate, etc, such as to set higher bitrate to get much better image quality. In general, the higher video bit rate, the larger output file size, and vice versa.
b. You can use the video editor designed in Pavtube BDMagic to edit your original videos. Click "Edit" on the main interface, and edit your videos by trimming (get/cut off video clips), cropping (remove unwanted areas), adding text/image/video watermarks, inserting subtitles, adding special effects, etc.
Step 3. Rip DVD to Sony Vegas Pro
Hit the "Convert" button at the bottom right corner to start copy DVD to Sony Vegas Pro. Once finished, hit "Open" button to get the MPEG-2, MOV, WMV, HEVC video for your Sony Vegas Pro 14/13/12/11.
How to Import Files into Sony Vegas Pro?
Once you’ve set up your Project, you will need to import video clips. Each folder is called a ‘Bin’, and you can create as many as you want by selecting the Media Bin>Right Click>Create New Bin.
This is important, because once you’ve setup your project into bins, you can search (Right Click on a bin>Search Media Bins…) these bins and you can even save your results into a ‘Smart Bin’ for future use!
There are two simple ways to import video into Sony Vegas Pro:
File>Import…>Media…
Click the Import Icon (next to the lighting icon)
Once you have imported your video clip, you can right click it and select Properties… to view its properties. You will also get a snapshot of it at the lower end of the Project Media Window, as shown in the above image.
Sony Vegas Pro allows native editing of many file formats, including R3D. For Red Media, if you right click the clip you will have the option of selecting File Format Properties… to get extra settings to ‘correct’ your R3D files.
 Free Trial BDMagic