Home
HomeSince Microsoft got into the hardware world in earnest, every Surface device from it has been impressive. First, the Surface Studio is an all-in-one PC, the first desktop in Microsoft's hit Surface line, which has set the benchmark for convertible laptops. It is equiped with a 28-inch 4.5K "PixelSense" display with 4500 x 3000 pixels. The big screen is really great for watching movies. However, whether the Surface Studio, or Surface Pro and Surface Book doesn't have a built-in DVD-ROM or DVD player for playing DVD movies directly.
Is there any way to move DVD movies from physical disc and play on Surface Studio? Of course it is feasible only if you rip DVD to Surface Studio supported video formats like MP4. Looking for a reliable way to do that? Now you're in the right place, here we'll show you how to rip and digitalize DVD to Surface Studio for getting rid of the disc and smooth playback.
Best DVD to Surface Studio Converter – Play DVD Movies on Surface Studio
To rip DVD to Surface Studio, first you need to get a DVD ripping program. Puzzle at which one to select? Here Pavtube DVDAid is highly recommended to help you easily get this work done. It is an intuitive DVD to Surface Studio converter that is able to convert DVD to Surface Studio compatible videos, like MP4 with fast speed and excellent output quality. What's more, this DVD ripper software can also rip DVD to a large amount of popular video formats like AVI, MKV, WMV, MOV, MPEG, FLV, 3GP, etc. It is specially designed for users to rip and digitalize DVD from physical discs to Surface Studio or other portable devices including Surface Pro, Google Pixel C, iPhone, iPad ,etc. for movie playback. Plus, you are allowed to trim, crop, add watermark and effect, attach external subtitles to source media before ripping your DVDs.
If you're a Mac user, simply get Pavtube DVDAid for Mac, which lets you rip DVD movies to Surface Studio on macOS Sierra, Mac OS X 10.11 El Capitan, Mac OS X 10.10 Yosemite, 10.9 Mavericks, 10.8 Mountain Lion, 10.7 Lion, 10.6 Snow Leopard,etc.
Now just download the right version according to your needs and follow the steps below.
Guide: How to Rip and Digitalize DVD to Surface Studio for getting rid of the disc
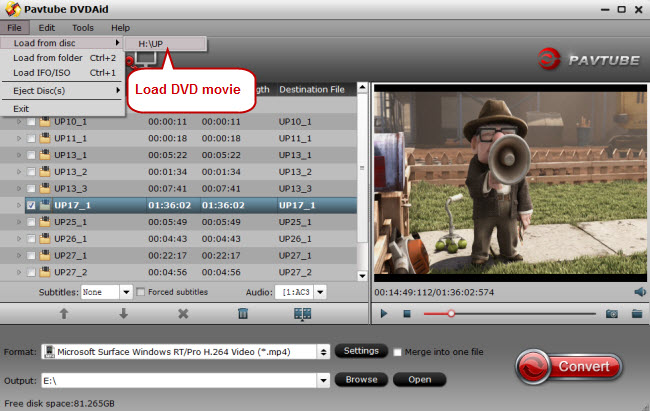
Step 1. Load DVD movie
After downloading, install and run the best DVD to Surface Studio converter, click “File”> “Load from disc” to load the DVD movie you want to watch on your Surface Studio.
Then you can preview the loaded DVD movie on the right window, what’s more, you can take some snapshots of you best-loved video scenes.
Step 2: Choose Surface Studio best video format
Video players installed on your Surface Studio can play MP4 videos well. Click the format bar to head to the output format list where you need to choose “Common Videos” > “H.264 High Profile Video(*.mp4).”.

Step 3. Adjust settings for Surface Studio (Optional)
If you want, you can then click "Settings" to adjust the video parameters manually. Remember the file size and video quality is based more on bit rate than resolution which means bitrate higher results in big file size, and lower visible quality loss.

Step 4. Change Video Output Aspect Ratio to fit your Surface Studio
As we all know, the aspect ratio on the Surface Studio is 3:2. In order to avoid black bars at the top and bottom of the picture when the DVD movie displayed on the Surface Studio, this software allows you to change video output sspect ratio.
Just click the “Edit” icon on the tool bar of main interface. On the “Video Editor” Window, you can play and preview the original video and output effects. Also you can flip video, trim, add effect, reset, and adjust volume,etc. For changing aspect ratio, go to "Crop" tab, in the right panel of the program, click to switch to advanced mode. Then choose "3:2" in "Display aspect ratio", and then go to "Settings" section to adjust the Video "Size(pix)" as 720x480 or 1440x960. After finished, click "OK" to confirm.

Step 5: Start to rip DVD to Surface Studio
When you have finished all the above settings, you can simply click the Convert button on the main interface and let the software do the DVD to Surface Studio conversion for you.
After the conversion, click "Open output folder" to locate the converted video files and then transfer them to your Surface Studio for getting rid of the disc and watching on the go with ease.
 Free Trial DVDAid