Home
HomeEither you need a funny gift video for your friends, or for a business presentation: if you're a Mac user, iMovie is more than enough for all your needs. As we all know, iMovie comes pre-installed in all newly bought Macs: so if you recently purchased a Mac, iMovie is already on your machine. It allows you to edit the films, make clips, add music/narration/photos, and create fun trailers from all that footage. However, when importing DVD to iMovie for further editing, you will encounter a common problem whereby the DVD file tends to grey out. So we write down this DVD to iMovie ripping tutorial to help you figure out problems like what formats are iMovie compatible with, how to rip DVD to iMovie on Mac. Thanks for reading!
Part 1: Best Formats for iMovie
Part 2: Rip DVD to iMovie with HandBrake for Mac (Only for non-commercial DVDs)
Part 3: Rip DVD to iMovie with Pavtube DVDAid for Mac (Commercial DVDs included)
Part 1: Best Formats for iMovie
Knowing what formats can be imported into iMovie natively can help you take necessary actions in time when fail to import DVD to iMovie for editing. The video formats supported by iMovie are limited, and not all video formats can be edited in iMovie. Below are the video formats that we can directly import to iMovie.
iMovie supported import formats: MPEG-4 (*.mp4), QuickTime Movie (*.mov), MPEG-2, AVCHD, DV& HDV.
You can check the details in the following sheet.
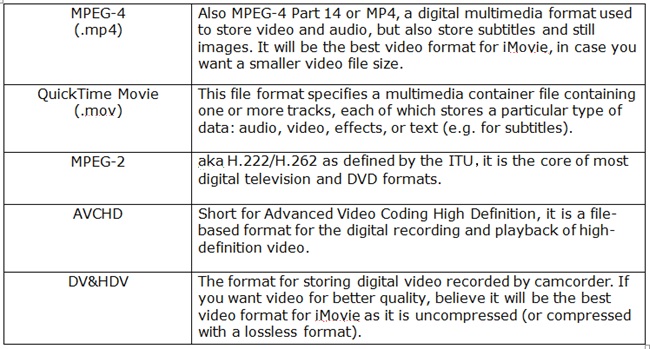
So, in order to import DVD to iMovie for further editing on Mac, we need a DVD to iMovie Converter to convert DVD to MPEG-4 (*.mp4), QuickTime Movie (*.mov), MPEG-2, AVCHD, DV& HDV, etc. that are supported by iMovie.
Part 2: Rip DVD to iMovie with HandBrake for Mac (Only for non-commercial DVDs)
If you are looking for a DVD to iMovie converter to convert homemade DVDs to iMovie, then Handbrake for Mac will be your best choice. Handbrake, as we all know, is powerful to free rip DVD to iMovie accepted MPEG-4 (*.mp4) formats. Please follow the tutorial about how to use Handbrake for Mac to rip DVD on Mac.
Step 1: Free download and install Handbrake for Mac first: https://handbrake.fr/
Step 2: Select a Source DVD you want to rip to iMovie by clicking "Source" button.
Step 3: Choose a Title and Chapters. Personally, if you want to rip the main movie, the track with the longest duration is usually the one you shall choose.
Step 4: Click the "Browse" button to choose the path where you want to save the output file in. Then Click "Save".
Step 5: Choose "MP4" from "Format" drop-down list. Go to Video tab, select "MPEG-4" from "Video Codec" drop-down list.
Step 6: Once you finish all the settings, you can go ahead to rip DVD to iMovie on your Mac computer by simply pressing the "Start" button on the left top of Handbrake for Mac version.
Part 3: Rip DVD to iMovie with Pavtube DVDAid for Mac (Commercial DVDs included)
For adding commercial DVDs with copy & region code protection(including CSS protection, Sony ArccOS, CSS region protection, UOPs, APS, etc.) to iMovie, you will first need to remove the protection and then convert DVD to iMovie accepted editing formats listed above. It would be a waste of time and energy to find one program to bypass the protection and another program to perform the conversion process. Here, a powerful application called Pavtube DVDAid for Mac (best dvd ripper), which helps to remove DVD copy & region protection without any third-party plug-in, in addition, you can easily rip DVD to iMovie supported formats listed above.
Supported OS: macOS High Sierra, macOS Sierra, Mac OS X 10.11 El Capitan, Mac OS X 10.10 Yosemite, 10.9 Mavericks, 10.8 Mountain Lion, 10.7 Lion, 10.6 Snow Leopard
How to Import DVD to iMovie Using Pavtube DVDAid for Mac?
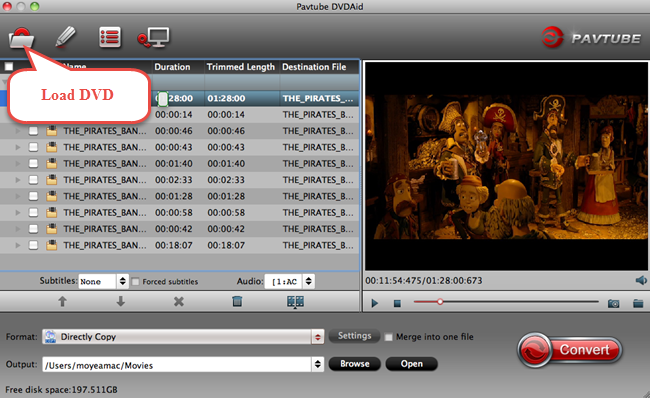
Step 1: Import DVD disc
First, put a DVD into your DVD drive and run the program. Hit the "load DVD" icon, the program will scan the disc to identify the titles to rip. Or you can drag-n-drop DVD files to the program window. Take a note, the DVD to iMovie converter can also rip DVD Folder, DVD IFO File, and DVD ISO Image File.
Note: With the program, you can select desired subtitle track and audio track, enable "Forced Subtitle" option besides "Subtitles" option, then you will see subtitles only when actors are speaking a different language.
Step 2: Output iMovie supported editing formats
Click "Format" bar, from its drop-down option, choose one of iMovie supported file formats such as MPEG-4 (*.mp4), QuickTime Movie (*.mov), MPEG-2, AVCHD, DV& HDV. If you are perusing a high performance and high quality of post production workflow of DVD video with iMovie, you can choose to output iMovie best editing codec - "Apple Intermediate Codec(AIC)(*.mov)".

Step 3: Edit DVD files
Click "Settings" icon to open profile settings window, you can choose or specify exactly the parameters you like. And in the Task information section, you can compare the detailed information of the source video and the target video.

Tip: Select an item on the main interface to open the “Video Editor” window, here you can flip or rotate video angel, trim video length, crop video black borders, add video/imag/watermark, adjust video color effect, remove/replace audio in video, add external srt/ass/ssa subtitles to video.
Step 4: Rip DVD to iMovie on Mac
Once you finish the output setting, hit the "Convert" button in the bottom-right of the screen to start the conversion process. When the conversion is finished, click "Open Output Folder" icon on the main interface to pop out the folder with converted files, then you will have no problem to import DVD to iMovie for editing on Mac.
 Free Trial DVDAid for Mac

Useful Tips
- Backup DVD to QNAP TS-1635 on macOS High Sierra
- How to Play DVD on Apple TV 4K?
- How to Rip, Convert, Import DVD to iMovie for Editing on Mac (macOS High Sierra included)?
- MacTheRipper DVD Ripping Problems & Solutions for beginner
- Guide: CloneDVD Alternative to Back up DVD Movies on Mac
- DVD to Final Cut - How to rip DVD to edit in FCP, FCP X, FCE on Mac?