Home
HomeAdding a video to your PowerPoint presentation is a great way to make it more interesting instead of switching back and forth between PowerPoint and your video player during the presentation. In fact, there are a couple of ways to add video to PowerPoint presentation. You can embed a video from YouTube, add a video stored on your PC, or even add Blu-ray/DVD movie clips to your PowerPoint presentation. Here's everything you've needed to know about using videos in your PowerPoint presentations.
Part 1: Add Video to PowerPoint from Hard Drive
For PowerPoint 2016, 2013:
1. In Normal view, click the slide that you want the video to be in.
2. On the Insert tab, click the arrow under Video, and then click Video on My PC.
3. In the Insert Video box, click the video that you want, and then click Insert.
For PowerPoint 2010:
1. In Normal view, click the slide in which you want to embed the video.
2. On the Insert tab, in the Media group, click the arrow under Video.
3. Select Video from file, and then browse to the location of your video, and select it.
4. On the Insert button, click the down arrow, and then click Insert.
Please note that in PowerPoint 2016, 2013, .mp4 files encoded with H.264 video (a.k.a. MPEG-4 AVC) and AAC audio are recommended, and in PowerPoint 2010, we recommend that you use .wmv files.
Part 2: Link to A Video Stored on Your PC
Linking to a video stored on your PC helps control the size of your PowerPoint file, but it isn't an ideal method if you'll be presenting without a network connection. What's more, to help prevent broken links, we recommend you to copy the video into the same folder as your presentation, and then linking to it there.
For PowerPoint 2016, 2013:
1. In Normal view, click the slide where you want the link to the video to be in.
2. On the Insert tab, click the arrow under Video, and then click Video on my PC.
3. In the Insert Video box, click the file that you want to link to, click the down arrow next to the Insert button, and then click Link to File.
For PowerPoint 2010:
1. On the Slides tab in Normal view, click the slide to which you want to add a video file.
2. On the Insert tab, in the Media group, click the arrow under Video.
3. Select Video from file, and then browse to the location of your video, and select it.
4. On the Insert button, click the down arrow, and then click Link to file.
For PowerPoint 2007:
1. In Normal view, click the slide to which you want to add a movie file.
2. On the Insert tab, in the Media Clips group, click the arrow under Movie.
3. Do one of the following:
a. Click Movie from File, locate the folder that contains the file, and then double-click the file that you want to add.
b. Click Movie from Clip Organizer, scroll to find the clip that you want in the Clip Art task pane, and then click it to add it to the slide.
Part 3: Embed A video from YouTube to PowerPoint
In PowerPoint 2013 or 2016, you can use the PowerPoint's developer tools to embed a YouTube video.
If you know the name of the video hosted on YouTube, do the following:
1. Click the slide that you want to add a video to.
2. On the Insert tab, click Video > Online Video.
3. In the Search YouTube box, type the name of the video that you want to insert.
4. Select the video from the search results, and click Insert.
5. A video rectangle is placed on your slide, which you can move and resize as you like. To preview your video on your slide, right-click the video, and then click Preview.
If you don’t know the name of the video hosted on YouTube, do the following:
1. Click the slide that you want to add a video to. In YouTube, find the video that you want to insert.
2. Below the video frame, click Share, and then click Embed.
3. Right-click the iFrame embed code, and click Copy.
4. In PowerPoint, on the Insert tab, click Video > Online Video.
5. In the From a Video Embed Code box, paste the embed code, and then click the arrow.
6. A video rectangle is placed on your slide, which you can move and resize as you like. To preview your video on your slide, right-click the video, and then click Preview.
Part 4: Insert Blu-ray/DVD Movie Clips into PowerPoint
To add Blu-ray/DVD in PowerPoint means inserting Blu-ray/DVD movie clips physically into PowerPoint so that it can play within the presentation. Sounds cool? Right? Let's start!
Since PowerPoint is not compatible with Blu-ray/DVD disc video and it only accepts few video formats including MP4, ASF, AVI, MPEG, and WMV, you need to use Pavtube BDMagic (Windows 10 included) to remove various Blu-ray/DVD copy protection and convert Blu-ray/DVD disc to PowerPoint supported video files, and then you can insert the converted videos to your presentation.
If you want to insert movie clips from Blu-ray/DVD disc to PowerPoint on Mac, try the equivalent Mac version – Pavtube BDMagic for Mac (Review), which is compatible with macOS High Sierra, macOS Sierra, Mac OS X 10.11 El Capitan, Mac OS X 10.10 Yosemite, etc.
Now just get the right version and follow the guide below to add Blu-ray/DVD videos to PowerPoint presentation.


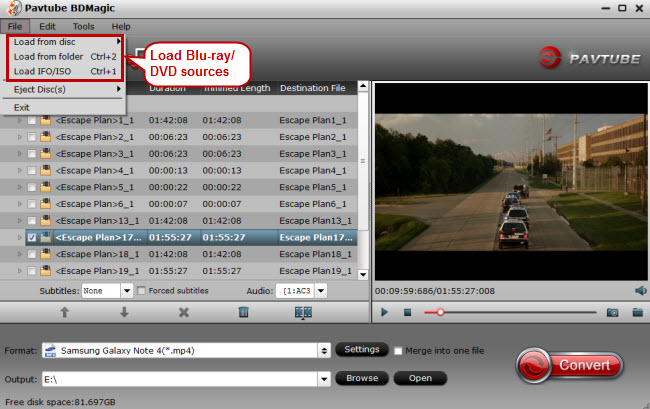
Step 1: Launch Pavtube BDMagic, and click the "File" >" Load from disc" button to load your Blu-ray/DVD movies to the program.
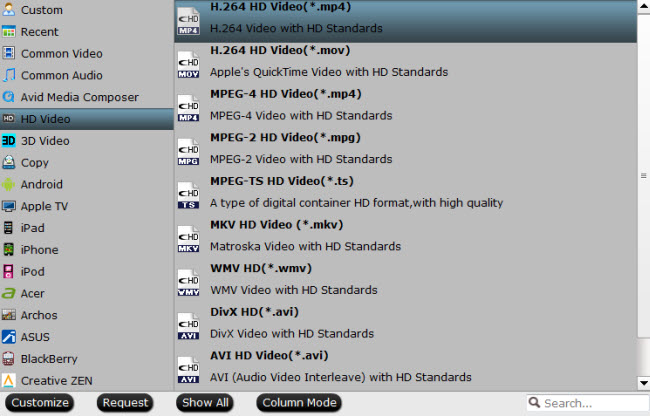
Step 2: Click “Format” drop-down menu, this will display a panel where you’ll select the format you want. Here, we pick H.264 MP4 as example.
Tips:
1. You can click “Settings” to change audio channel, change video resolution, adjust bitrate, etc.
2. You can edit the videos according to your requirement. Click on the “Edit” button at the right side of the video to start editing it.
Step 3: Back to the main interface, hit the big “Convert” button on the right bottom corner to start the conversion. Just a few minutes later, you will get the converted video.
Step 4: Now follow the steps in Part 1 to add Blu-ray/DVD videos to your PowerPoint presentation.
More Tips: Making the Presentation Self-Contained
Once you have finished making your presentation with your uploaded videos, save it as a packaged PowerPoint presentation and not a full PowerPoint file by clicking File > Save As > PowerPoint Show.
If you plan to send your presentation to clients, present it on other people’s computers, or don’t know if you will have a network connection, you should make sure the presentation is self-contained (i.e. a Make the PowerPoint file contains everything it needs).
Unfortunately, without a network connection there is no way to play embedded videos, or play videos that you have linked. So if you are using a video embed, you will have to download the file and follow the steps under ‘Adding video from your hard drive’ to accomplish this. If the YouTube video you have embedded belongs to you our your company, you can download a copy of the file. If you have embedded a video that does not belong to you then you’ll just have to make sure you have a network connection before beginning your presentation.
 Free Trial BDMagic