 Home
HomeThat's Amazing! When you're enjoying high-definition Blu-ray, DVD movies in the comfort of your living room with the Sony's new Projector. It's called the Xperia Touch, and it's part smart speaker, part projector and part virtual Android tablet. The projection is touch-capable at 23 inches, and view-only at larger dimensions up to 80 inches. It works better in the dark, and won't ever be as crisp as a TV, laptop or phone display. Can't wait to enjoy your favorite Blu-ray or DVD movies on this excellent Sony Projector? Just read this article, you will get the best program that helps you easily play Blu-ray/DVD with Sony Xperia Touch Projector from laptop.
Backup Blu-ray/DVD Movies For Sony Xperia Touch Projector Playback
As we know, the Blu-ray and DVD movies we purchased from store are copy protected, so you can't copy movies from Blu-ray/DVD disc to any devices directly, in this case how can we get Blu-ray/DVD to laptop for Sony Xperia Touch Projector playback?
Recommended on line, Pavtube ByteCopy (Review) is the perfect choice. It can convert all Blu-ray/DVD Movies to common, HD, 4K, 3D videos to all popular video and audio formats like AVI, H.265, M3U8, MP4, MOV, MKV, MPG, FLV, 3D, etc. for playing on HD media player, Tablets, Smartphones, Game consoles, 4K TV, 3D TV, Projectors, etc.
With this Blu-ray/DVD Ripper, you can adjust video codec, bitrate, frame rate, size and audio channel, size, bitrate, sample rate to get best settings for Blu-ray/DVD rips for Sony Xperia Touch Projector. Display aspect ratio, brightness, contrast and saturation are also supported to adjust.
If you are using Mac, please use the equivalent Pavtube ByteCopy for Mac (Review) which can make you rip Blu-ray/DVD with best settings for Sony Xperia Touch Projector on Mac OS X (macOS High Sierra included).
How to Rip Blu-ray/DVD For Sony Xperia Touch Projector Playback
Step 1. Load BD/DVD movies
Click "File">"Load from disc" button to import Blu-ray/DVD movies that you want to convert, besides Blu-ray/DVD disc, you can also load Blu-ray ISO, Blu-ray folder, DVD disc, DVD ISO, DVD folder. Pavtube ByteCopy is quite a versatile DVD and Blu-ray ripper, and you can just feel free to throw other sources like Blu-ray ISO image, Blu-ray folders, DVD IFO files, DVD ISO images, and DVD folders to it.

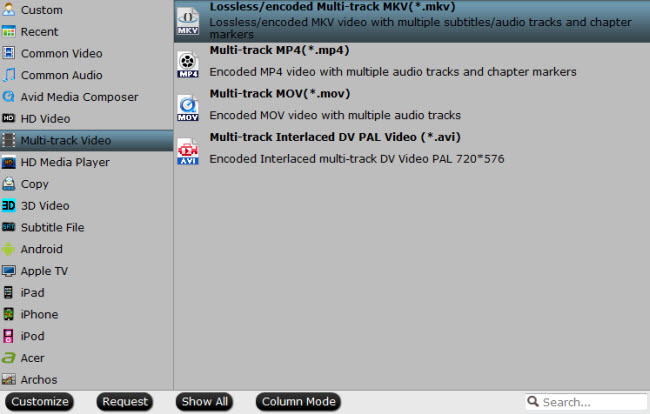
Step 2. Choose output format
Pavtube ByteCopy offers hundreds of video and audio formats. Just choose the output format you need.
Here, you can choose "Common Video -> H.264 MP4 Video (*.mp4)", this format is well supported by many playable devices and your Sony Xperia Touch Projector. Besides, you can also choose Multi-track Video -> Multi-track MKV/MOV/MP4 for output, the three output formats can maintain all original audio tracks for you.
Tip: Reset audio/video settings
Before convert Blu-ray/DVD to Sony Xperia Touch Projector for watching, you can click "Settings" button and adjust the output parameters like resolution, bitrate, frame rate, codec and others. Just change them according to your need.
Step 3: Start Blu-ray/DVD ripping for Sony Xperia Touch Projector
Finally, click "Convert" button to start ripping Blu-ray/DVD to computer or media player for Sony Xperia Touch Projector playback. When the conversion finishes, click "Open output folder" to find the converted video files. Then you can effortless transfer the video files to Sony Xperia Touch Projector for playback.
How to Connect Computer to Projector?
Steps for Connecting a Laptop to a Projector
1. Make sure your computer and laptop are both turned off.
2. Connect the video cable (usually VGA) from your laptop’s external video port to the projector.
3. Plug your projector into an electrical outlet and press the “power” button to turn it ON.
4. Turn on your laptop.
5. If you need audio for your presentation, connect the laptop’s “audio out” port to the projector, or to another sound system.
6. Sync the projector and laptop by holding down the FUNCTION key and pressing one of the following keys to toggle: Laptop to Projector Function Keys.
Steps for Connecting a Macbook to a Projector
1. Turn ON your Mac.
2. Plug in the projector to an electrical outlet and turn it ON.
3. Connect the video cable (usually VGA or HDMI) from the projector to the Mac. In order to do this, you will most likely need a Mac adapter cable.
4. Once the Mac and projector are connected, click on the Apple Menu in the top left corner of your screen.
5. Select System Preferences from the drop-down menu.
6. Select the Displays icon.
7. When the Displays window appears, click the Detect Displays button.
8. At this point your Mac and projector should be synchronized. If not, try following these steps:
a. Click on the Apple Menu in the top left corner of your screen (Step 4)
b. Select System Preferences from the drop-down menu (Step 5)
c. Select the Displays icon (Step 6)
d. When the Displays window appears, select the Arrangement tab within the menu bar
e. Check the Mirror Displays box in the lower left-hand corner of the window
(Note: After checking this box, wait several seconds. Once the displays are mirrored, you should see the same image on both your projector and computer.)
 Free Trial ByteCopy


