 Home
HomeCloud storage is more and more an integral part of most of our lives, giving us access to our movies from any device , anywhere in the world. If you have tired that you need the complex steps to play a DVD: find the disc, slide it into a DVD player—or a computer with a DVD drive—and flip your TV to the proper input, you can rip and put DVD to the cloud media storage then you can watch DVD videos via Cloud on your TV, iPhone, iPad, etc.
There's an overwhelming number of companies offering cloud storage. Popular cloud storage services have Dropbox, Microsoft OneDrive, Google Drive, Mega, Amazon Drive, pCloud, Tresorit, SpiderOak, Box, Knowhow Cloud, MediaFire, Apple iCloud, Mozy. You can pick anyone to storage your DVD library by price, features, storage limits and more.
Getting Started With a DVD to Cloud Ripper
To turn a real-world DVD into a digital file then you can store on a Cloud, you have to copy the contents of a DVD to your computer, and then convert those contents to a cloud-friendly format. In order for this to work, obviously, you must have a DVD Ripper. A DVD ripper is a computer program that facilitates copying the content of a DVD to a hard disk drive. They are mainly used to transfer video on DVDs to different formats, to edit or back up DVD content, and to convert DVD video for playback on media players and mobile devices.
Pavtube ByteCopy is such a this kind of DVD copying and converting tool for Windows user. A physical disc or folder of DVD files can be loaded into Pavtube ByteCopy. Pavtube ByteCopy has internal decrypting tool to remove DVD copy protection such as CSS, region code, RCE, Sony ArccOS, UOPs, Disney x-project DRM, etc then exact DVD movie to Video-TS folder, VOB files or other digital files. You can choose the output format according to your Cloud compatible video formats. Pavtube ByteCopy can convert DVD to HD AVI, HD MP4, HD MKV, WMV, FLV, WebM, MOV, HEVC, etc and even can convert DVD to 3D SBS video for your VR Headsets using.
In addition to choosing the output profile for Cloud storage and streaming, you can tinker with the audio and video properties when it comes to the encoder, resolution, bit rate, frame rate, aspect ratio, sample rate, and channel mode so that you can stream DVD via Cloud on any device with most compatible A/V parameters. Also, you can merge multiple clips into a single file, trim videos to convert only the parts you're interested in, choose 3D mode, rotate and crop clips, make image adjustments (brightness, contrast), and apply text or image watermarks.
If you are a Mac user, you can use Pavtube ByteCopy for mac which enables you copy DVD on MacOS Sierra, El Capitan, etc.
Detailed Steps to Rip DVD to Cloud-compatible Formats
Step 1. Load DVD movie
Insert the DVD disc into your computer’s DVD drive and run DVD Ripper. You can load the DVD movies by clicking the “Load DVD” button on the top left. This DVD converter also supports ripping ISO and IFO files. What's more, Pavtube ByteCopy also can decrypt Blu-ray so you also can load Blu-ray to convert to Cloud.
Some Blu-ray and DVD movies have multiple subtitle and audio tracks, you can choose your desired one in "Subtitle" and "Audio". If you don't need subtitle, you also can choose to rip DVD with forced subtitles.

Step 2: Choose output format
Pavtube ByteCopy can convert DVD to Cloud in various formats. You should choose the output format according to your specific need.
If you just want to play DVD via Cloud on PC, you are advised to backup DVD to MP4, AVI, WMV, MKV (Windows 10 already supported);
If you want to transfer DVD to Cloud for iPad/iPhone/Apple TV/Mac and other Apple devices streaming, then you can choose to rip DVD to MP4, MOV, M4V;
In addition, as for Android streaming, converting DVD to MP4, H.264, 3GP, WebM, MKV video formats are suggested.

Tip: To adjust video and audio parameters like codec, aspect ratio, bit rate, frame rate, sample rate, you could click on “Settings” button.
Step 3. Start to convert DVD to Cloud format
After all these have been prepared, just click the “Convert” button to begin the DVD to MP4, AVI, MOV, etc conversion for Cloud storage. After that, click Open button to get the output video clips and play on mobile devices/TV, edit, share them online anywhere you like.
Once you’ve liberated your movie library, you’ll want to make it available for viewing anytime, anywhere from Cloud. Here gathered several popular Cloud that can store your DVD library.
Selection 1: Add files to your Dropbox
2. Click Upload files.
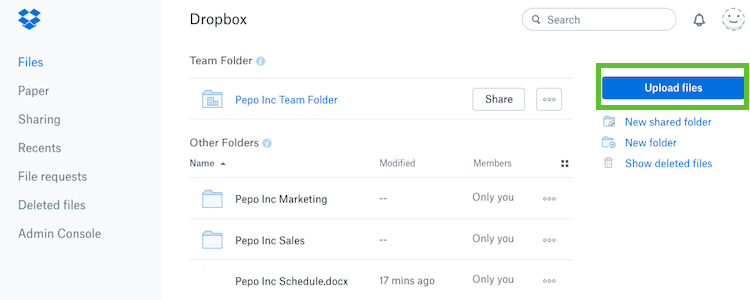
3. In the popup, click Choose File and then select the file on your computer that you’d like to add to Dropbox.
4. Choose as many files as you like, and then click Start Upload.
Note: Each file you upload through the website must be 20 GB or smaller. For larger files, use the desktop or mobile app, which don’t have a file size limit.
Selection 2: Upload files and folders to Google Drive
Upload & view files
On your computer, you can upload from drive.google.com or your desktop. You can upload files into private or shared folders.
Drag files into Google Drive
1. On your computer, go to drive.google.com.
2. Open or create a folder.
3. To upload files and folders, drag them into the Google Drive folder.
 Free Trial ByteCopy


