Home
HomeThe DTS-HD mark is frequently presented on Blu-ray Discs, as it is an optional audio codec accepted by Blu-ray Alliance. DTS-HD Master Audio delivers sound quality that matches the clear and vivid images of high-definition video provided for correct configurations. With 7.1 channels of sound, DTS-HD MA creates a listening experience that brings the spectators right into the action, and that’s why it is favored by audiophiles. Few Blu-ray Rippers on market can recognize DTS-HD MA, Pavtube Blu-ray Ripper is one of them. It supports both DTS-HD and Dolby TrueHD and is capable of converting the audio to Dolby 5.1 surround sound.
The following guide focus on how to set Dolby 5.1 channels when ripping Blu-ray disc with DTS-HD Master Audio. You could download the clean trial version of Pavtube Blu-ray Ripper for Mac from here. The trial version provides full access to the functions so that you could test the conversion quality. The app is compatible with both Leopard and Snow Leopard. An external BD drive is required as a plus.
Step One. Getting started.
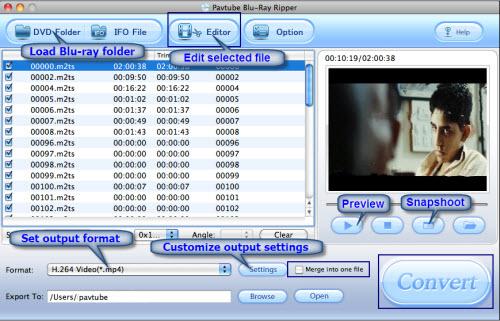
Connect the external BD drive with Mac and put Blu-ray disc in. Run Blu-ray Ripper for Mac and the interface below will pop up. Click “DVD Folder” to import Blu-ray disc from the drive. It takes a few seconds till all the M2TS files are loaded to file list. Check the main movie and leave unwanted M2TS files unchecked. The main movie is distinguished by its duration---the longest one.
Step Two. Adjusting audio and video settings.
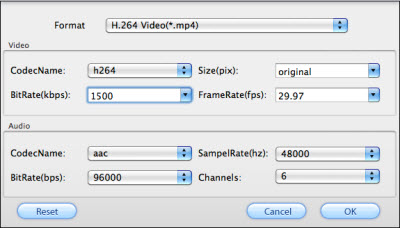
Right below the file list lays the “Audio” option, where you could adjust the dubbing to your native language. Tracks are identified by numbers so you have to listen by yourself to make sure which is the right one you want. In this case the preview window makes senses. Next click “Settings” and customize advanced audio and video parameters. Here you choose a favorable format from versatile video and audio formats. Since we’re talking about 5.1 sound, it will be a nice idea to choose H.264 encoded videos, like H.264 MP4, H.264 MKV and H.264 MOV. Click on “Channels” and check “6”, and confirm your settings by clicking “OK”.
Step Three. Ripping Blu-ray movie and get 5.1 sound.
This is the last step, and all it required is one click on “Convert” button and great patience. There is no doubt that Blu-ray ripping be time-consuming. Personally I would like to advise you set auto shutdown in progress window (it pops up once you click Convert) and leave it there.
 Free Trial BDMagic for Mac