Home
HomeWD TV HD Media Player enables users to watch high-definition videos from Camcorder drive and USB storage devices freely on big screen HDTV. It supports quite a number of video formats, even DVD ISO image file. Many DVD collectors would rip DVD to ISO and play them back over WDTV so as to protect their DVDs from scratching and quality loss caused by playbacks. Some High-definition fans would be disappointed to find that Blu-ray ISO file can not be read by WD TV. But there is nothing to regret, still we have other way to go through. Since MKV video is well supported by WD TV HD Media Player, a best solution is to rip Blu-ray movie to HD MKV with Dolby Digital 5.1 channels, which is compatible with WD TV HD Media Player.
The following guide focus on how to rip Blu-ray disc to HD MKV with 5.1 channels. You could download the clean trial version of Pavtube Blu-ray Ripper from here. The trial version provides full access to the functions so that you could test the conversion quality. The application is proved to works stably on Windows 7. In addition, you need a BD drive, either internal or external.
Step One. Getting started.
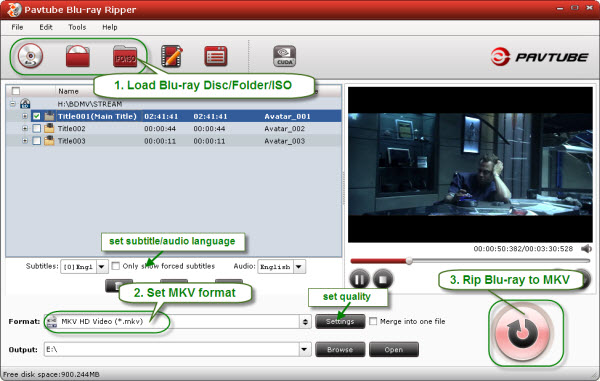
Put Blu-ray disc in BD drive. Run Blu-ray Ripper for Mac and the interface below will pop up. Click “DVD ROM” to load in Blu-ray disc. It takes a few seconds till all the M2TS files be loaded to file list. Check the main movie and leave unwanted M2TS files unchecked. The main movie can be distinguished by its duration---the longest one. Below the file list you could find "Subtitle" and "Audio" droplist, where you can set output subtitles and dubbings to the languages you like.
Step Two. Adjusting audio and video settings.
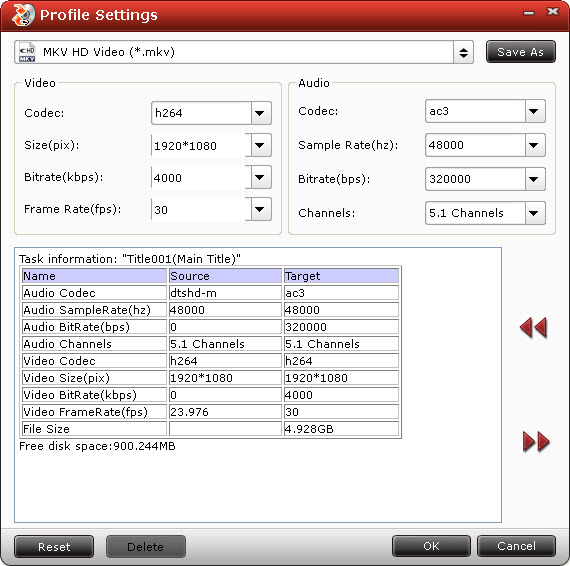
Right below the file list lays the “Audio” option, where you could adjust the dubbing to your native language. Tracks are identified by numbers so you have to listen by yourself to make sure which is the right one you want. You could view the files in preview window. Then click “Settings” and customize advanced audio and video parameters. Here you choose a favorable format from versatile video and audio formats. Since we’re talking about 5.1 sound, it will be a nice idea to choose HD Video-> MKV HD Video. Set "Codec" to "AC3" and “Channels” to “5.1 channels”, and confirm your settings by clicking “OK”.
Step Three. Ripping Blu-ray to MKV and get 5.1 sound.
Finally click on “Convert” button to start ripping Blu-ray disc. Blu-ray ripping is time-consuming. You could set auto shutdown in progress window (it pops up once you click Convert) or leave it there and come back later (the ripper will tell you how long it takes).
Tip 1: A view log will pop up when you import Blu-ray movie to the app, simply click "OK" to confirm and close it. (or press Alt+O)
Tip 2: By default all the M2TS files are checked, you may right-click at the file list area and try "Uncheck All".
Tip 3: To eliminate the interlacing lines, you can perform "Deinterlacing" feature under "Edit"-> "Effect".
 Free Trial BDMagic