Home
HomeDaVinci Resolve is a potential software tool for video editors and is commonly used by professionals. There are so many tools and features to explore inside, and you can do creative editing, advanced trimming, multicam editing and transitions and effects to your movies and television posts. But if you import Blu-ray videos into Davinci Resolve for further editing, then you may not be able to use it so interactively. The article below will provide you complete information about how you can import and edit Blu-ray movie clips in Davinci Resolve.
Media Compatibility Between Blu-ray Disc and Davinci Resolve
Before we go any further, let's first get well known of which formats are supported by DaVinci Resolve. Details as below:
Video codec: QuickTime, Prores, DNxHD, MXF, DPX, CIN, EXR
Image format: TIFF, JPEG, MOV, TGA, BMP
Camera raw format: Blackmagic CinemaDNG RAW, ARRI Alexa RAW and Amira. RED One, EPIC , Scarlet and Dragon R3D files including +5K, monochrome and HDRx images, Cineform , Cineform 3D, Phantom Raw, GoPro, Nikon, Canon C300, C500 and 1D, 5D, 7D, Sony F65/F55/F5 RAW, Sony XAVC variants
From above lists, we can see that Davinci Resolve handles a number of native camera files and video formats, however, the compression codec used by the BDAV container format on Blu-ray disc are three mandatory video compression formats H.262/MPEG-2 Part 2, H.264/MPEG-4 AVC or SMPTE VC-1 and audio compression Dolby Digital, DTS or uncompressed Linear PCM, which are not included in Davinci Resolve supported media formats list above.
Recommendation: Convert Blu-ray to DaVinci Resolve Acceptable Files Such as DNxHD Codec
Since Blu-ray disc file is not supported by DaVinci Resolve due to any reason, then you need to turn to a powerful Blu-ray Ripper software called Pavtube BDMagic for Mac(macOS High Sierra included), which ia able to automatically bypass the AACS encryption and BD+ copy protection on all the Blu-ray disc even the recently released ones in the backaround. Then you can use the program to comprehensively convert Blu-ray movies to Davinci Resolve favorable editing codec such as QuickTime, Apple Prores or DNxHD. Besides, it also helps users to import DVD to DaVinci Resolve for editing.
Edit Blu-ray movies before conversion
Pavtube BDMagic for Mac is commonly used by beginners for processing and editing Blu-ray video files as it offers highly interactive user interface with wide set of advanced features. You can flip video horizontally or vertically, rotate video clockwise or counterclockwise to get it displayed in the right angle, trim or cut Blu-ray video to remove unwanted parts or segments, crop Blu-ray video to cut off unwanted black borders or area, personalize Blu-ray video with video/image/transparent text watermark, split large Blu-ray video into small parts, merge separate video clips into one, adjust picture effect like brightness, contrast, saturation, apply special rendering effects to your video or add external SRT/ASS/SSA subtitles to Blu-ray video.
For Windows users, please turn to Pavtube BDMagic to transcode Blu-ray for editing with Davinci Resolve on Windows 10.
Steps to Convert Blu-ray Video to DaVinci Resolve Supported DNxHD Codec
Mac Version Pavtube BDMagic is taken as example, Windows Version share the same steps, just keep in mind you have download the right version.
Step 1: Load Blu-ray movie
Install and run the best Blu-ray to DaVinci Resolve converter, click the "Load Disc" button to load your Blu-ray movie clips to the program.
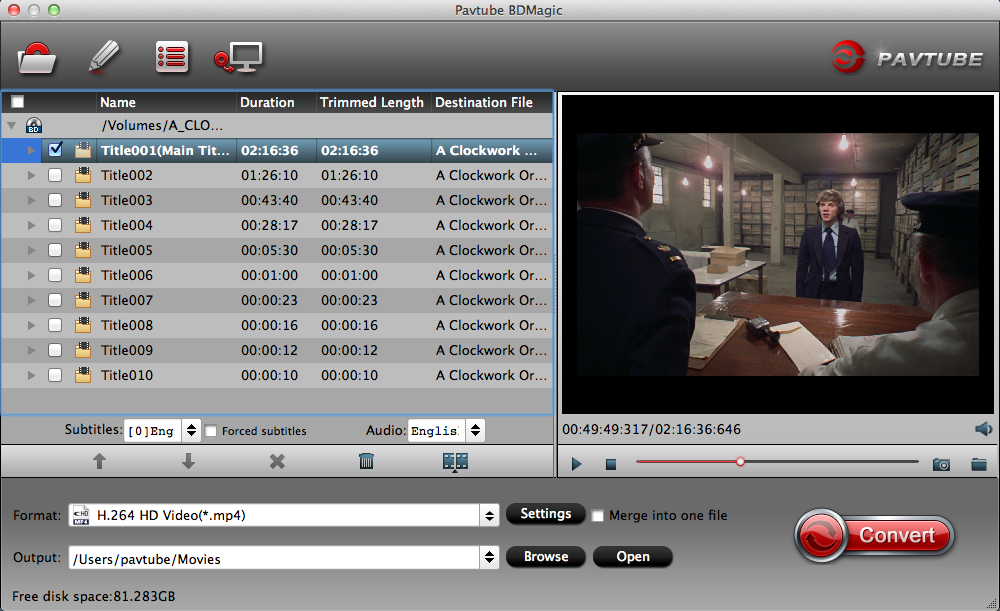
Step 2: Specify output file format
Click “Format” bar, from its drop-down list, select Davinci Resolve best supported editing codec such as “Avid DNxHD (*.mov)” from “Avid Media Composer” category.

Tip 1: Determine you video resolution, bit rate, frame rate, etc. (optional)
Click "Settings" button if you'd like to customize advanced audio and video parameters like video encoder, resolution, video bit rate, frame rate, aspect ratio, audio encoder, sample rate, audio bit rate, and audio channels.
Tip 2: Do basic video editing (optional)
This Mac video converter has some simple edit functions like cropping, trimming, adding effects etc. so you can touch up the video with basic video editing functions by clicking the pencial like icon on the top tool bar to open "Video Editor" window.
Step 3. Start converting Blu-ray for DaVinci Resolve
Click the "Convert" button, the converter will start encoding Blu-ray for importing to DaVinci Resolve. Soon after the conversion is finished, just click "Open" button to get the generated files for editing in DaVinci Resolve without any hassle.
Read More: How to Import Video to DaVinci Resolve
There are three useful techniques to import videos to DaVinci Resolve:
A: Import from Media Browser
Once you have created your project, then simply click on Preferences at top left corner of DaVinci Resolve.
Step 1: Set your hard drive for DaVinci Resolve interaction and then check the option “automatically display attached storage locations”.
Step 2: Search for your desired files in the Media Storage Browser, the viewer window will help you to preview all selections.
Step 3: Now select your required file and simply drag and drop the file from the Media Browser window to the Media Pool.
Step 4: If you want to customize the project settings, do it now by clicking the option Change to change the settings.
Step 5: If you want to delete the media after previewing, you can right click the video and select “remove selected clips” to delete.
If you want to process multiple files simultaneously, click on the empty area on the Media Browser panel and then click and drag across the multiple clips.
The batch file processing task can also be completed by using ‘add folder and subfolder to media pool’ option. It will help you to get files from different folders within very less time.
If you just want to import a portion of the video to the media pool, you should try the Create Subclip feature:
> Choose your media clip and open it with viewer.
> Set In-Out points for your sub-clip.
> Simply right click on Job Bar and then choose option to make sub-clip. The new clip will immediately appear on media pool.
B: Import from File
It is also possible to import files using File Menu option. The process is quite simple and demands just a few seconds. Locate your file position, then press Open option to bring your video files to the media pool without wasting much of your time.
C: Directly Drag and Drop
This is the simple technique. Use drag and drop feature to get your media files on pool directly.
 Free Trial BDMagic for Mac

Useful Tips
- Edit Blu-ray Movies in Davinci Resolve
- Free Rip DVD with Forced Subtitles on Mac (macOS High Sierra included)
- Rip DVD to Import to Davinci Resolve for Editing
- Rip and Import DVD to Premiere Elements(15, 14, 13, 12, 11, 10) Easily
- Convert DVD to Premiere Pro (CC, CS6, CS5, CS4) Editable Video
- Review: Mac Blu-ray Ripping for iOS, Android Tablets & Phones