 Home
HomeAre you an avid collector of DVD discs? If so, I believe that you are familiar with DVD backup, or preparing to do DVD copy. That's because a huge DVD collection occupies too much space and the discs can be easily damaged if we do not store them properly, but every DVD disc costs us a lot. Plus, spending several hours to find the wanted DVD from a heap of DVDs makes us feel too terrible. To avoid such troubles, some friends choose to copy DVD to Hard Drive, USB, or SD Card for storage. However, if you have a large DVD collection, these methods won't satisfy your needs due to their limited storage space and the risk of data loss. For me, I choose to copy DVD to Synology NAS drive. Then I can freely sharing media files on a home network, or across the world, no worry about running out of storage space and losing media date. Sound great? Just read on this article. We will share the tips and tricks for ripping DVD to Synology NAS drive in the simplest way.
To put DVD onto Synology NAS drive, at first, we have to decrypt the copy protection on commercial DVDs. As we all know, the copy protection used by media distributors not only helps to prevent piracy, but also prevents you from making backup copies of your DVDs. And there are many different types of DVD copy protection, including Analog Protection System (Macrovision), CSS Encryption, CPRM and more. How to remove all the protection from DVD discs? The only thing you need is a third-party DVD ripper software to get the content off the DVD disc as a protection-free and easily readable element for Synology NAS drive.
Recommend Top DVD Ripper for Synology NAS Drive
Here we highly recommend Pavtube ByteCopy for Mac (Review), which is a perfect DVD to NAS ripping solution working on macos 10.13, macOS Sierra, Mac OS X 10.11 El Capitan, Mac OS X 10.10 Yosemite, 10.9 Mavericks, 10.8 Mountain Lion, 10.7 Lion, 10.6 Snow Leopard. It can help every user to bypass DVD copy protection, including CSS, Region code, Analog Protection System and more. It is also capable of ripping DVD to MP4, AVI, MKV and other popular media formats for NAS streaming with no quality loss. The intuitive interface clearly shows all conversion and editing options for users and you're free to customize any profile, then store onto Synology NAS Drive for safe-keeping or convenient playback.
Windows version is here. Right now let me directly show you how to copy DVD to Synology NAS drive. It is very simple with no complicated steps and professional knowledge required.
Steps to rip and copy DVD to Synology NAS drive
Mac Version Pavtube ByteCopy taken as example, Windows share the same steps. Just keep in mind you have download the right version, Mac platform .exe files cannot be installed on Windows – and vice versa.
Step 1: Load DVD Movies
Launch ByteCopy for Mac, click "Load Disc" button to import source DVD movie into this app. If you have some Blu-ray collection, this app can also help you to rip Blu-ray to NAS for streaming and playback.
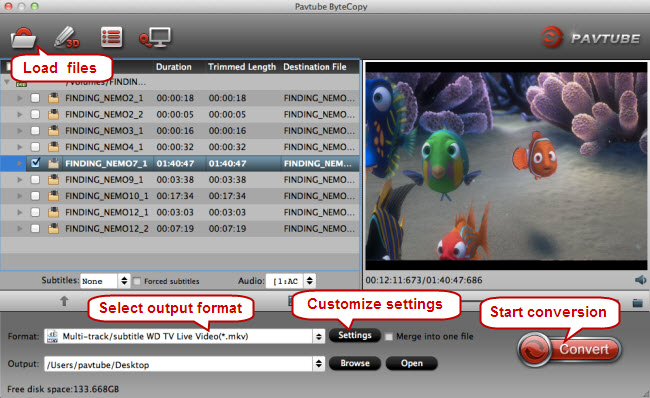
Step 2: Rip DVD for Device streaming with Synology NAS Drive
Click "Format" bar to select "HD Video" > "H.264 HD Video(*.mp4)" which is the most compatible file format which works on iPhone, iPad, Apple TV, Android phone/tablets and Windows phone and tablets, etc. If you wish to backup DVD without quality loss, just output "Multi-track Video" > "Lossless/encoded Multi-track MKV(*.mkv)".
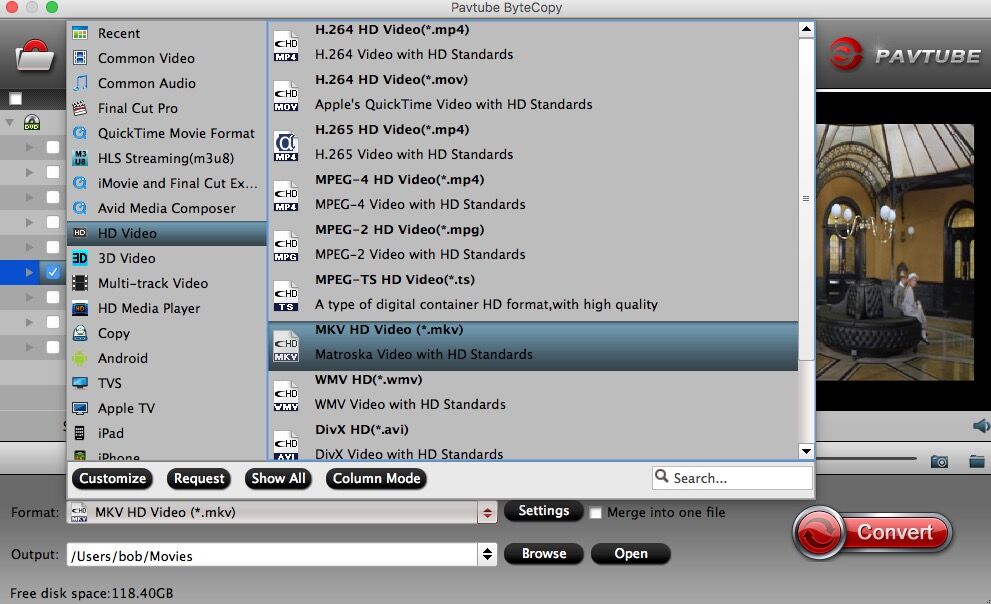
Tips: Best Format for Ripping DVD to Synology NAS Drive
As a Network Attached Storage, Synology NAS Drive have no requirement for the specific file formats stored on it.
If high quality video output is appealing for you, you can backup DVD to Synology NAS Drive with MKV format. As a HD video format, MKV gives great video image quality identical to the original one's and is widely accepted by media servers and players. But you will sacrifice more space to store MKV file.
Plus, NAS devices in digital formats for streaming via stereo systems, DLNA/UPnP compatible media streamers like iPhone, iPad, Apple TV, Android devices, game consoles, convert DVD to MP4 format that is a universal format and widely compatible with all gadgets. On the other hand, MP4 keeps a good balance between file size and quality.
Step 3: Start to rip DVD to Synology NAS
If you like, you can click "Settings" bar to tweak video size, bitrate, frame rate, and more on your movies. Or pressing "Edit" to customize DVD movies as per your needs. You can trim the videos, crop, add watermarks, add subtitles, apply special visual effects and more with this DVD editor.
After all settings, hit the "Convert" to rip DVD to Synology NAS drive. After the conversion, open output folder to find the output files. Then just stream and enjoy the high quality DVD movies on your media players.
Tips: Transfer DVDs to Synology NAS Drive for Streaming
After you ripped DVD to Synology NAS drive format on computer, you can upload DVDs to Synology NAS following your NAS tutorial:
1. Download File Station on Synology.
2. Go to the left panel of the program and choose the local files/folders.
3. Just drag and drop the converted DVD files on your computer and start to backup DVD to NAS drive. The speed is theoretically much faster than that of uploading file to Cloud.
 Free Trial ByteCopy for Mac

Useful Tips
- Backup DVD to QNAP TS-231P NAS on macOS High Sierra
- Best Blu-ray Ripper for macOS High sierra
- How to Get Blu-ray Playback on macOS High Sierra iMac/MacBook (Air/Pro)/Mac Mini/Mac Pro/iMac Pro?
- How to Copy Blu-ray on macOS High Sierra?
- Best Solution to Copy DVD to Hard Drive in lossless MKV on macOS High Sierra
- Top 5 Paid/Free OGMRip Alternatives for Mac (macOS High Sierra included)


