 Home
HomeNowadays, with the mass of data we produce and the growing number of computers and devices in our homes, the reliable data storage and access from multiple devices have become more critical for home owners. Ready to meet that demand, Synology has announced the new DiskStation DS418j for home use and with a home-friendly price to boot. This new NAS comes equipped with a 64-bit dual-core CPU and 1GB of DDR4 memory that allow it to hit performance numbers of 112 MB/s read and 87 MB/s write under a RAID 5 configuration in a Windows environment. The NAS can have up to 40TB of total capacity with 4 x 10TB HDDs.
With such amazing NAS in hand, why not creating your own Blu-ray library? So that you can manage, protect and share the Blu-ray moveis effortlessly. Sound great? For NAS beginner, you will learn several different ways to backup Blu-ray to Synology DiskStation DS418j in this post.
Part 1: How to Set Up Your Synology DiskStation DS418J
Part 2: Different Ways to Backup Blu-ray to Synology DiskStation DS418j
Part 1: How to Set Up Your Synology DiskStation DS418J
For those people with no basic knowledeg of I.T., here is the setup guide for the DS418J Server NAS.
Install Drives:
1. Remove the 4 screws that secure the back cover, and then put the back cover down carefully.
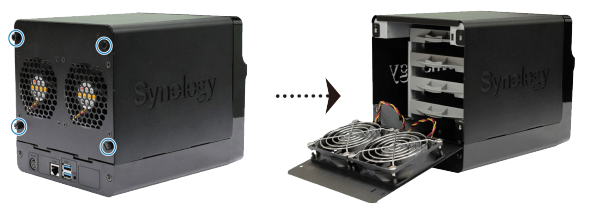
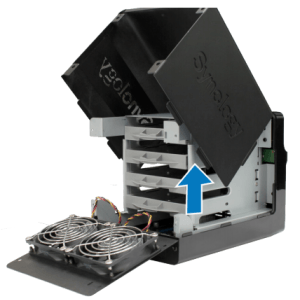
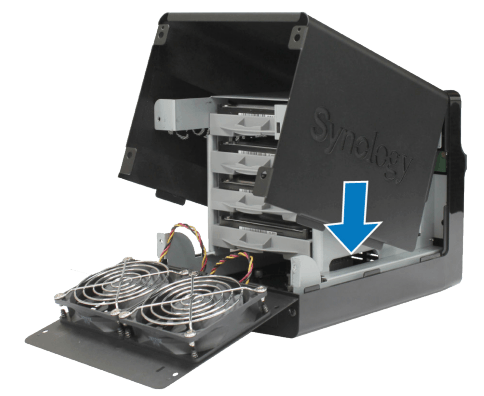
2. Lift the upper case and then place it aside.
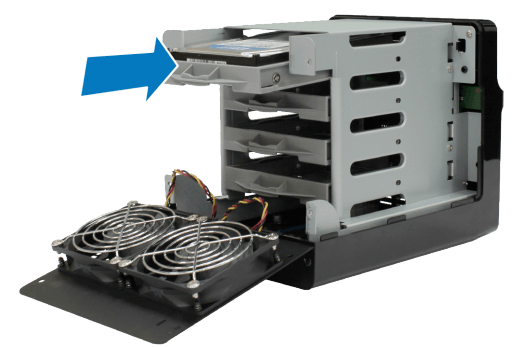
3. Load drives in the drive trays.
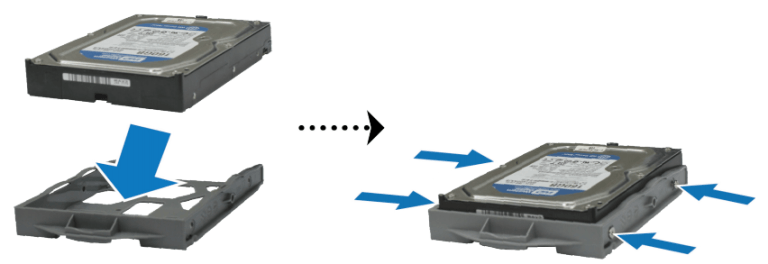
a. For 3.5” drives: Place the drive in the drive tray. Then tighten the screws to secure the drive in place.
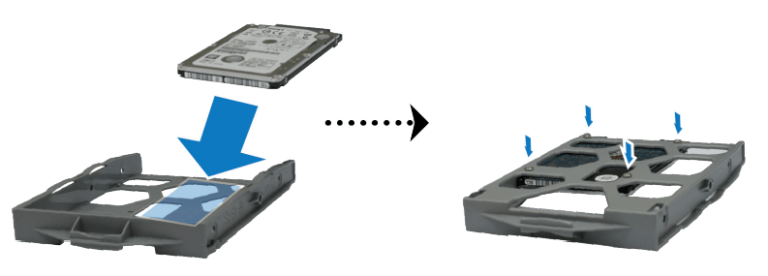
b. For 2.5” drives: Place the drive in the blue area (shown below) of the drive tray. Turn the tray upside down and tighten the screws to secure the drive in place.
4. Insert the loaded hard drive tray into the empty hard drive bay.
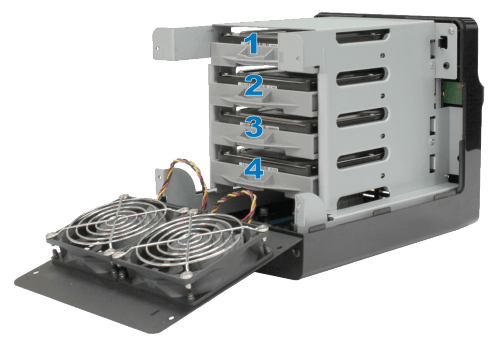
5. Repeat the steps above to install all prepared drives. Drives are numbered as shown below.
6. Place the upper case back to its position. Close the back cover. Replace and tighten the 4 screws you removed in step 1.
Start Up DS418J DiskStation NAS:
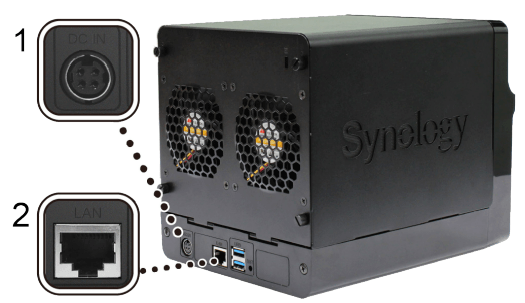
1. Connect the AC adapter to the power port of the DiskStation. Connect one end of the AC power cord to the AC power adapter, and the other to the power outlet
2. Use the LAN cable to connect the DiskStation to your switch, router, or hub
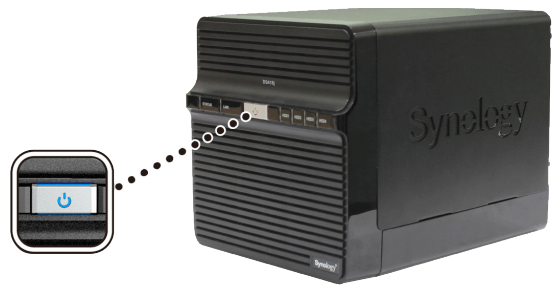
3. Press your power button to turn on your DiskStation.
Your DiskStation is now online and detectable from a network computer.
Source Article: Setting Up Your Synology DiskStation DS418J In Just 15 Minutes – A Hardware Installation Guide
Part 2: Different Ways to Backup Blu-ray to Synology DiskStation DS418j
Preparations for copying Blu-ray to Synology DiskStation DS418j
A Mac or Windows computer
Your Blu-ray discs
An internal or external Blu-ray drive
Begin of backing up Blu-ray to DiskStation DS418j
Step 1: Download and install Pavtube ByteCopy (Pavtube ByteCopy for Mac).
This is an one-click program that is capable of ripping DVD/Blu-ray to MP4, AVI, MKV, WMV, etc to NAS for streaming in all kinds of media devices without quality loss. It's so easy to use and stable.
Key features of Pavtube ByteCopy:
> Rip any copy protected and region locked Blu-ray /DVD discs to Synology DiskStation DS418j.
> 1:1 backup Blu-ray/DVD to Synology DiskStation DS418j with original video structure and video quality.
* Copy Blu-ray/DVD to lossless MKV and multi-track MP4/MOV for Synology DiskStation DS418j.
* Backup DVD/Blu-ray to Synology DiskStation DS418j in H.265, MP4, AVI, MOV, etc video format and FLAC, WMA, MP3 audio format.
* Trim, crop, split and merge Blu-ray movies before ripping DVD/Blu-ray discs to Synology DiskStation DS418j.
* Adjust A/V codec, size, bitrate, frame rate, sample rate and display aspect ratio.
Step 2: Add Blu-ray movies
Inserting your Blu-ray discs to Blu-ray drive. When you installed this best Blu-ray Ripper then you can open it. Click "File" to choose "Load from disc" to load Blu-ray discs. Then you can choose forced subtitle below the chapter list.

Step 3: Copy Blu-ray in different ways
Here, you have many choices to copy Blu-ray to Synology DiskStation DS418j.
Option A - Full copy Blu-ray to Synology DiskStation DS418j
Click  on the top of the menu to start to entire copy Blu-ray to your Synology DiskStation DS418j with original Blu-ray structure ( the original subtitle languages, audio tracks, chapter information, etc preserved)
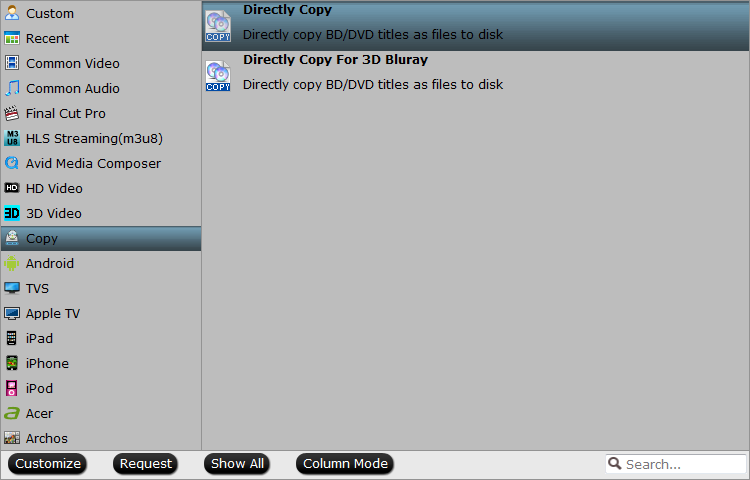
Option B - Directly backup Blu-ray to Synology DiskStation DS418j
In this way, you only extract the main title from Blu-ray discs without preserving the extra info. You can save lots of storage space by backing Blu-ray to M2TS. From "Format" bar, select "Copy" > "Directly Copy".
Option C - Rip Blu-ray to lossless MKV
When you convert Blu-ray to lossless MKV, you can get smaller movie size without any video/audio quality loss. You can keep multiple subtitle streaming and multi-track audio. You also can preserve all the chapter markers in the Blu-ray movies to make you stream the Blu-ray movies conveniently. Navigate to "Format">"Multi-track"> "Lossless/encoded Multi-track MKV(*.mkv)".

Option D- Output digital file formats or device preset profile formats
From "Format" bar drop-down list, select one of your desired video formats or device preset profile formats according to your own needs.

Tip: If you want to preview the size of output Blu-ray backups, you can click "Settings". Here, you not only can preview the output size but also adjust video and audio parameters.
Step 4: Start to backup Blu-ray to Synology DiskStation DS418j
Go back to the main interface, press right-bottom "Convert" button to start to rip Blu-ray to Synology DiskStation DS418j. In this way, you can play your Blu-ray movies freely and don't worry scratching the discs.
Read More: Synology DS418j key specifications
| CPU |
|
| Memory | 1GB of DDR4 |
| Storage |
|
| Ports |
|
| Files system |
|
| Pysical |
|
| Warranty | 2-year |
 Free Trial ByteCopy


