 Home
HomeBlu-ray is wonderful to watch in Home Theater, that's why so many people love to collect them. Nowadays, it's difficult to find an old classic film in torrent video sites while you can easily get it in Blu-ray if you have collected them. Blu-ray is not just for watching films. You also can extract some interesting clips from Blu-ray Premiere Pro CC 2017 to edit and make your personal fantastic video. When you upload this kind of video to YouTube, you can attract more audience.
Premiere Pro CC 2017 supports Blu-ray BDAV MPEG-2 Transport Stream. So if you want to edit Blu-ray disc video in Premiere Pro CC 2017, you can copy Blu-ray disc to M2TS file with a Blu-ray copy tool. For more smooth editing, you also can convert Blu-ray to Premiere Pro CC 2017 more compatible ProRes, QuickTime MOV, Windows Media Video(Windows only) with some Blu-ray Ripper software. If you have no Blu-ray ripping and copying experience ever, you can read the article and learn the ways.
Best Blu-ray Ripping Tool to Enable Blu-ray Disc Editable in Premiere Pro CC 2017
Pavtube ByteCopy for Mac is an advanced and intuitive tool that enables you to copy Blu-ray to M2TS folder for Premiere Pro CC 2017 and rip Blu-ray to Premiere Pro CC 2017 acceptable QuickTime MOV, ProRes, DNxHD, H.264 MP4, DV AVI and more with excellent video and audio quality.
Moreover, you can resize the video to a custom width and height or a predefined dimension (e.g. 1280x768, 1920x1080), keep or disregard the aspect ratio, as well as crop and pad the image. It's also possible to split the movie into smaller sizes, as well as to combine multiple clips into a single one. Generally, a Blu-ray film is 120 minutes and we usually don't need to import the whole Blu-ray video to Premiere Pro CC 2017. With ByteCopy for Mac, you can trim the Blu-ray video to determine the beginning and ending of the video clip. There are more features of ByteCopy for mac, you can read its review to learn more about it.
Step by Step to Rip Blu-ray to Premiere Pro CC 2017
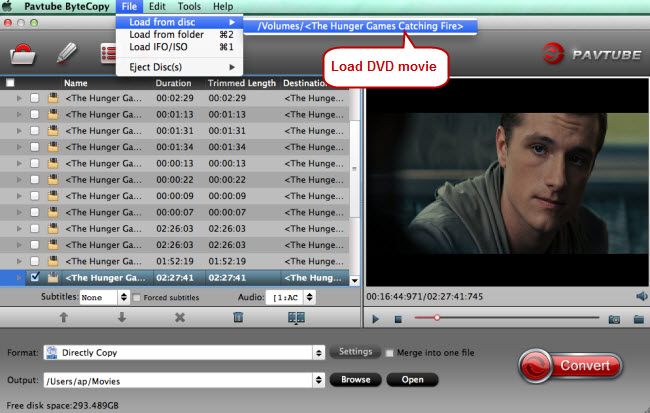
Step 1: Load Blu-ray Disc
Launch the Blu-ray to PrPro application on your computer, click "File" > "Load from disc" to Load Blu-ray disc from optical drive. You also can load DVD disc to rip to Premiere pro. When both Blu-ray and DVD exists, the software will load DVD. Blu-ray and DVD ISO images are also supported.
Step 2: Copy and Rip Blu-ray for Premiere Pro CC 2017
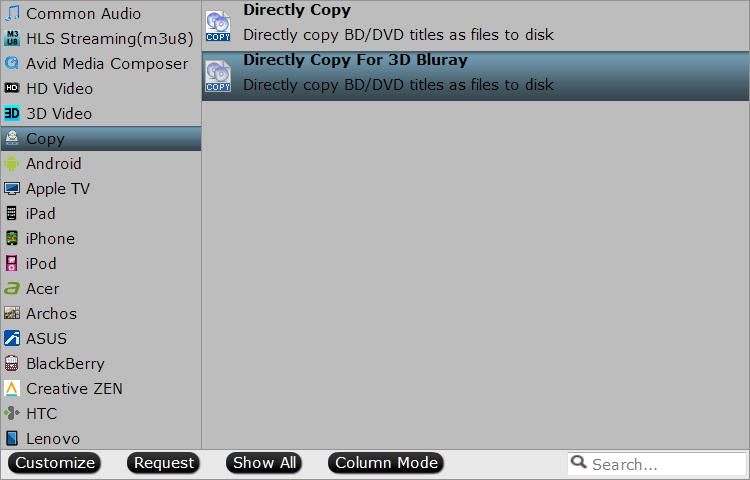
Copy Blu-ray to Premiere Pro
If you want to backup Blu-ray to M2TS for Premiere Pro CC 2017, you can click "Format" > "Copy" > "Directly Copy" to extract M2TS file from Blu-ray disc.
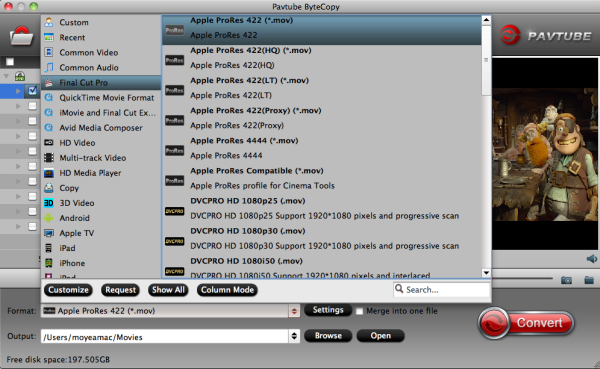
Rip Blu-ray to Premiere Pro CC Supported Digital Format
If you have an old computer, you can directly use the program to output Premiere Pro CC specially optimized editing format "MPEG-2(*.mpg)" under "Adobe Premiere/Sony Vegas..." main category.
If your computer can perfectly handle HD even 4K video, you can select one of PPC compatible format such as Prores from "Final Cut Pro" > "Apple Prores 422(*.mov)" or "Apple Prores 422(HQ)(*.mov)". ByteCopy for Mac even can rip Blu-ray to multi-track ProRes for Premiere pro CC 2017 in "Multi-track" video.
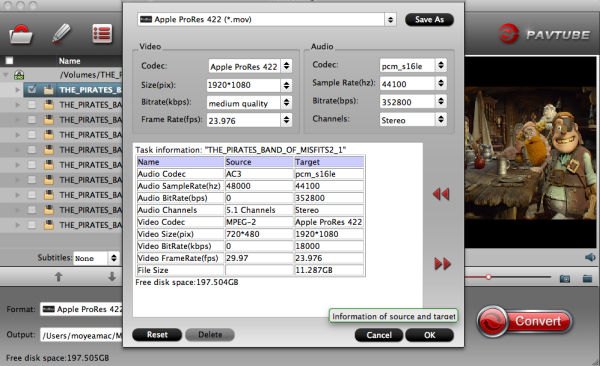
Then, click "Settings" to open "Profile Settings" window to adjust video and audio parameters to make the output video has desired frame rate, bitrate, resolution.
Step 3. Start converting Blu-ray to Premiere
Click the big “Convert” button in the main UI to begin the Blu-ray to M2TS, MPEG-2 or ProRes conversion. You can see your converted videos by clicking “Open” button.
Then you are able to import and edit converted Blu-ray footage in Premiere Pro CC 2017 all versions without any problem (The Hot Key to load files to Premiere is “Command” + “O”). Enjoy!
How to Burn Blu-ray discs with Premiere Pro CC 2017?
Following is a general procedure for making DVDs/Blu-Rays using Encore and Premiere Pro CC 2017.
First download ImgBurn (The Official ImgBurn Website )
General workflow some use:
1. Convert PP sequence to H264-Blu-ray to get an m4v file and a separate audio file;
2. Open Encore, choosing Bluray and bring in your HD menu;
3. Import your m4v and audio files as the timeline;
4. Set your end point for your timeline;
5. Connect your timeline(s) to your menu;
6. Build your Blu-ray under "Build" pane choosing Blu-Ray for "Format" and "Output" as Blu-ray image;
7. Choose your destination by naming the image.
8. Then "Build" the image.
9. Once finished, load a BDR Blu-ray disc in your burner, open ImgBurn and open your Blu-ray image (iso) file.
10. Burn your disc.
The above is a general process many follow when burning Blu-rays. Basically, create an iso image to be burned in ImgBurn. Encore isn't the greatest at burning Blu-rays. DVDs are generally burned using the same general procedure.
 Free Trial ByteCopy for Mac

Useful Tips
- Backup DVD to QNAP TS-231P NAS on macOS High Sierra
- Best Blu-ray Ripper for macOS High sierra
- How to Get Blu-ray Playback on macOS High Sierra iMac/MacBook (Air/Pro)/Mac Mini/Mac Pro/iMac Pro?
- How to Copy Blu-ray on macOS High Sierra?
- Best Solution to Copy DVD to Hard Drive in lossless MKV on macOS High Sierra
- Top 5 Paid/Free OGMRip Alternatives for Mac (macOS High Sierra included)


