Home
HomeSony announced its newest recording video format "XAVC" at the end of 2012 and two camcorders from Sony named PMW-F55 and PMW-F5 can record videos in XAVC using level 5.2 of H.264/MPEG-4 AVC which is the highest level supported by that video standard which can support 4K resolution at up to 60fps as well as 2K resolution at 30fps.
While XAVC is a very new and rare format, and only few video editing programs listed on Sony website such as Adobe CS6, Avid, Final Cut Pro X, Grass Valley, Quantel, Rovi, and Sony Vegas Pro 12 claims to support XAVC native editing, while no DVD burning program is listed on Sony website for creating XAVC video to blank DVD. If you want to burn Sony XAVC videos to DVD for watching , it will be a difficulty, especially for Mac users since very few DVD burning program available on Mac based pc.
Don't worry, here is a professional XAVC to DVD burning program recommended for Mac users - Pavtube DVD Creator for Mac, so that you could easily and effectively create DVD discs from Sony CAVX video footages for viewing on home DVD player.
Step 1. Download Free Pavtube DVD Creator for Mac.
The user-friendly DVD burning software Pavtube DVD Creator for Mac lets you create playable DVD from pictures, music and various video types, including AVI, MKV, WMV, MOV, MTS, M2TS, TiVo, MOD, TOD, etc. This flexible DVD creator also provides you with plenty of editing features to personalize your DVD.
Step 2. Add Sony XAVC video.
There are two ways to add Sony XAVC videos into Pavtube DVD Creator for Mac.
1. Drag and drop Sony XAVC video files to source area directly.
2. Click the "import" button to load the XAVC files.
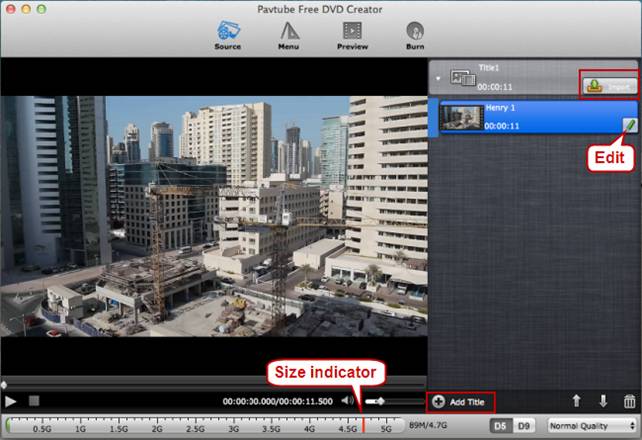
Tip 1: Each file is recognized as a chapter after being imported to DVD Creator on Mac. To create another Title, click the "Add Title" button and add more source videos. Please notice the size indicator at the bottom, if exceed the red line, you are suggested change to DVD9 or remove some videos.
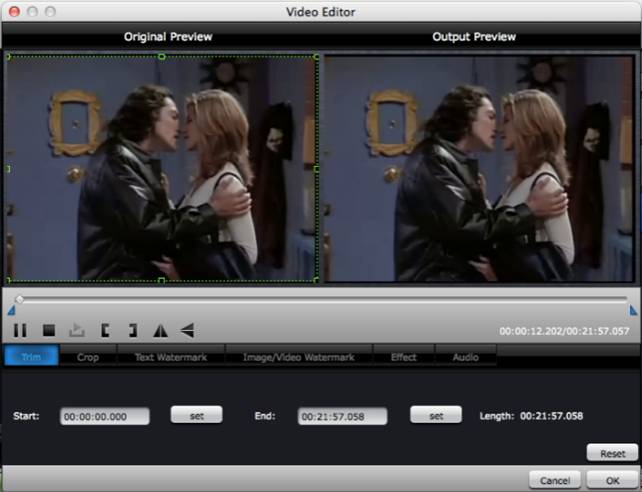
Step 3. Edit Sony XAVC video files. (Optional)
If you want to edit your Sony XAVC videos before burning, simply click "Edit" tab. The "Video Editor" dialogue box will come up, on which you are allowed to do video editing such as, trimming, cropping, adding watermark, adjusting video effects, etc.
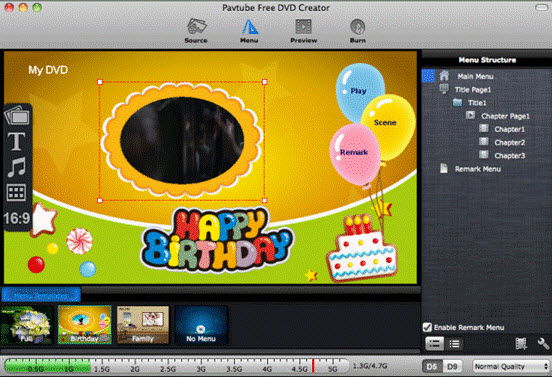
Step 4. Customize DVD menu.
Switch to Menu pane and choose a favorite DVD menu template for your DVD. You can change the background video/image, background music, text, title thumbnail and more for your DVD menu.
Step 5. Preview and start Sony XAVC videos to DVD burning.
clicking the "Preview" button to preview your DVD movie content, DVD menu template, etc and aake sure everything is perfect before burning process starts. Then insert a blank DVD disc to your DVD burner and click "Burn", just half an hour around, you will get a DVD disc from your Sony XAVC video footages with Pavtube DVD Creator for Mac.
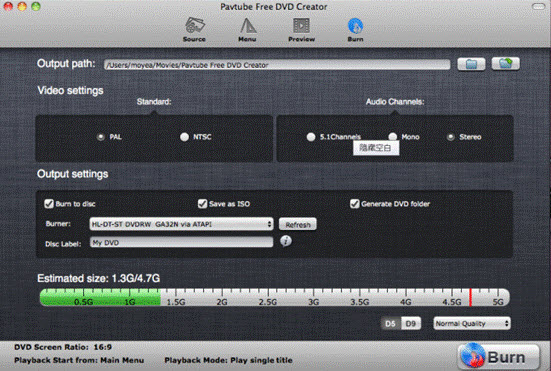
Tip 2: If your DVD burning project is larger than estimated 4.7G and you don't have a DVD9 disc (7.9G), just insert a DVD5 disc, Pavtube DVD Creator for Mac will resize it to fit a DVD5 disc.
Hope this help you make DVD from Sony XAVC video files. Meanwhile, if you would like to free burn movies to DVD or burn downloaded YouTube videos to DVD disc as well on Mac, Free Pavtube DVD Creator for Mac can do the favor too.
 Free Trial DVD Creator for Mac

Useful Tips
- How to Make a DVD Photo Slideshow with Transitions and Music on Mac
- Burning AVCHD to DVD--how to convert and burn AVCHD(.mts) to playable DVD on Mac
- Easy and Effective Way to Burn Sony XAVC Video clips to DVD on Mac
- How to burn Final Cut Pro projects to DVD on Mac?
- Free Burn AVI, MKV, MP4 to DVD on Mac
- Quick burn DVD folder to DVD on Mac