 Home
HomeThere comes a time you feel like having certain part of the movie instead of a full-length one when ripping a blu-ray or DVD to Mac. And yes, you may also want to keep the movie structure and save each chapter as individual movie clip. Pavtube Blu-Ray Ripper for Mac is right what you need at those moments. The Pavtube Blu-Ray Ripper for Mac not only helps you convert blu-ray movies to AVI, DivX, MP4, MOV, M4V, MPEG, MP3, AAC etc for playing back on Mac, but also allows users to cut and save their favorite episodes from a series or trim a blu-ray/ DVD movie into individual chapters. Pavtube offers you free trail version of Blu-Ray Splitter, you may click the link to download and afterwards install the powerful and easy-to-use movie splitter. Find below a step-by-step guide how to cut and trim blu-ray or DVD movies with Pavtube Blu-Ray Ripper for Mac:
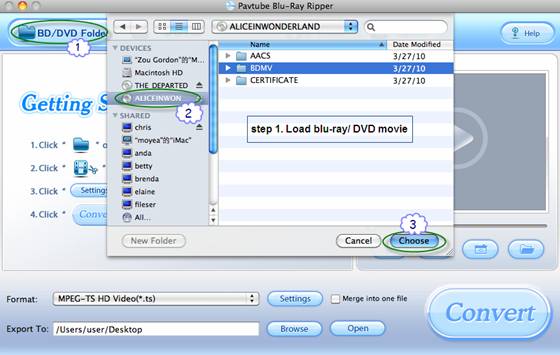
Step 1. Run the Mac Blu-Ray Trimmer and load blu-ray movie.
Note that you an external BD drive is required for ripping blu-ray on Mac. Once run the movie splitter, click “BD/DVD Folder” to add Blu-ray movie files. This Mac Blu-Ray trimming software is able to convert blu-ray and DVD movies into various video formats, such as MP4, MOV, M4V, AVI, DivX, MPEG, MKV, FLV, VOB, F4V, FLV, MP3, etc.
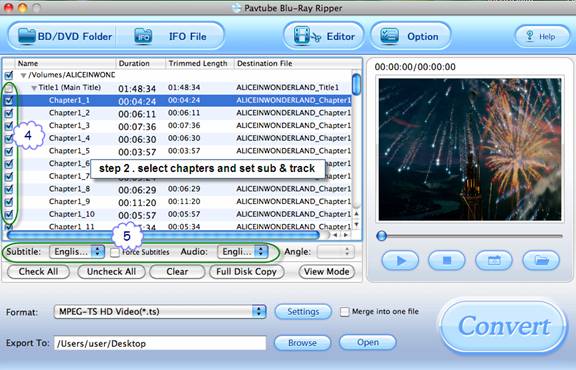
Step 2. Set subtitle and audio track for loaded blu-ray movie.
By default the files are listed in Title Mode, all the chapters are in numerical sequence for you to check individually. Generally, ‘Title001’ contains the main movie, and other Titles are commentary, menus, titles and ads. If you want to rip the main movie only, do uncheck other sequences. Right below the file list you could find ‘Subtitle’and ‘Audio’ drop-down list, where you may set subtitles and dubbings to the languages.
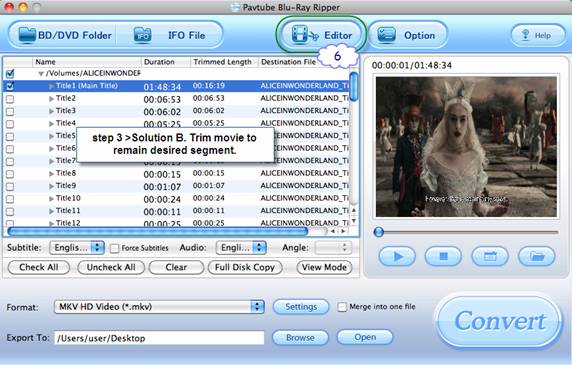
Step 3. Trim the blu-ray or DVD movie on Mac as you like.
Solution A. Divide the movie into individual chapters.
If you’d like to save the movie clips as individual chapters, follow the workflow: right-click in the file list area, select “Uncheck All” in shortcut menu. Click the plus sign to display all the subchapters, check all these subchapters, and the movie splitter will output video clips in chapters. If you’d like to cut some subchapters out, just uncheck them.
Solution B. Trim the movie to remain desired duration only.
You may also trim the blu-ray/ DVD movie by setting specific start and end points, so that the movie trimmer will remain your desired duration only. In that case the Trim function in the Editor is your choice. Select the subchapter you want to trim and click on “Edit” menu to enter Editor, where you can cut movie clip manually by setting the start and end points for each segment.
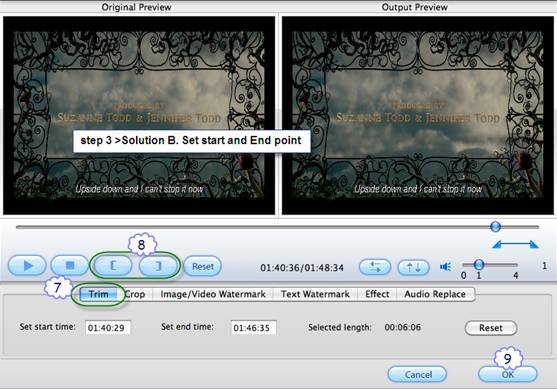
Now switch to “Trim” tab to set start and end time. Either input specific time point in “Start” and “End” field or click “[“ and “]” to specify the duration you want to keep. The other segments will be trimmed out. In the picture below I cut the last part of blu-ray movie ALICE IN WONDERLAND (01:40:36 to 01:48:34). Do not forget to click “OK” and confirm your settings.
Step 4. Save trimmed blu-ray movie AVI, DivX, MP4, MOV, M4V, MPEG, MP3, AAC etc.
Back to the main interface of Mac Blu-Ray Spliter, click on the “Format” bar and decide which format you’d like to save the trimmed movie. You can output HD video up to 1920*1080 as well as common SD video of DVD quality (720*480), and YouTube web video quality (320*240). To trim a blu-ray/ DVD movie into individual chapters, you can now click “Convert” button to start trimming blu-ray movie and ripping trimmed duration to desired video and audio formats. To combine all the trimmed duration into one video file, you’ll also need to check “Merge into one” box before clicking “Convert” button to trim blu-ray movie.
 Free Trial BDMagic for Mac

Useful Tips
- How to Play Blu-ray Movies on Android Tablet?
- Blu-ray ripping- how to keep 5.1 and 7.1 audio?
- [How to] Turn your Blu-rays to iTunes playable 1080p MP4 movies
- How to rip Blu-ray movies to Xvid encoded AVI video?
- Convert MKV to H.264 MP4 for streaming over DLNA
- Easy way to backup Blu-ray Movies with only Forced Subtitles


