 Home
Home
Blu-ray movies do not always include one language. Chances are that two or more languages are spoken in one movie. In that case, going without subtitles is not a brilliant idea. Take the blu-ray movie 2012 (region A) for example, you have English as default audio track, so some guys thought they need no subtitles when backing the blu-ray movie to Mac. And they did rip the blu-ray movie to Mac without subtitles. However, when playing the ripped blu-ray movie on Mac, they would be disappointed to find that in some scenes Chinese is spoken, and there are no subtitles! If you do not want to see subtitles when they speak English, and would like to retain the subtitles for the scenes of foreign languages, you got to figure out a way extracting Forced Subtitles.
Forced subtitles are subtitles that included in commercial Blu-ray and partial DVD movies so as to provide a better visual experience to display the characters when a foreign or alien language is spoken, a sign, flag or other text in the scene is in different language. The forced subtitle is embedded into one of the streams and you have to get it out and remix it to the video. The process could be very complicated. Here I would introduce you an easiest way keeping forced subtitles when ripping blu-ray to Mac. Below is a guide on how to do a blu-ray backup with forced subtitles:
Required hardware: Mac with external BD drive
Required software: Pavtube Blu-Ray Ripper for Mac
Step 1. Load blu-ray (or DVD) movie to Blu-Ray Ripper for Mac
Connect BD drive with Mac via USB cable, and place the blu-ray disc/DVD you want to rip in BD drive. Run the Blu-Ray Ripper for Mac, click “BD/DVD Folder” to import standard DVD or Blu-ray movie. Here I import blu-ray movie Avatar, in which a foreign language “Navi” is spoken.
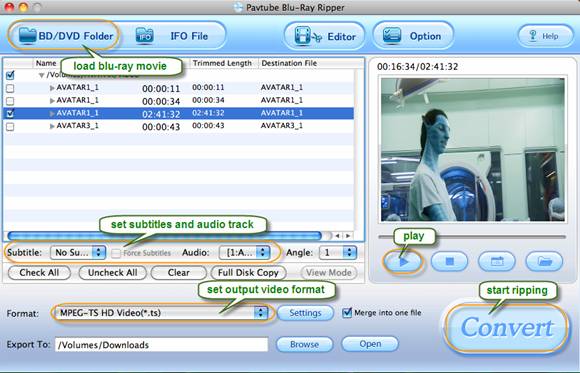
Step 2. Set Forced Subtitles for chapters you want to rip.
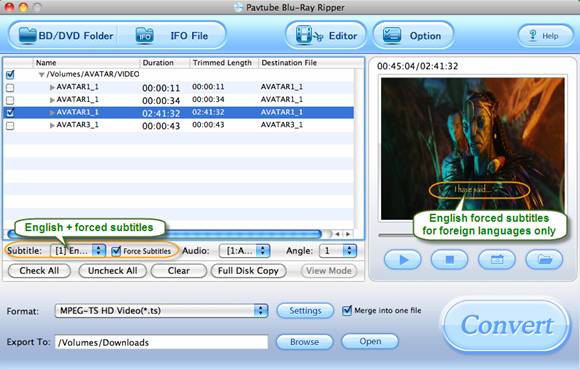
By default no subtitle is set. Select a chapter and click play button, you’ll find there are no subtitles when previewing. Set Forced subtitles for each chapter follow this way: specify a language as your English in “Subtitle” pull-down list, and check “Only show force subtitle” before converting Avatar to hard drive. The Pavtube Blu-Ray Ripper for Mac can extract forced subtitles from blu-ray discs and DVDs for you.
Avatar movie with English Forced Subtitle (English subtitle is included only Navi language is spoken):
Step 3. Specify output format.
The Pavtube Blu-Ray Ripper for Mac allows users to rip blu-ray movies to MKV, AVI, MP4, WMV, TS, MOV, M4V, etc of up to 1080p HD quality. Just click “Format” bar to set a desired format.
Step 4. Rip blu-ray movies to Mac with forced subtitles.
Click “Convert” to start ripping blu-ray to Mac. The blu-ray ripping software will handle the English subtitles in Avatar only when the Navi are speaking.
Why Pavtube Blu-Ray Ripper for Mac?
The Pavtube Blu-Ray Ripper for Mac could copy Blu-ray and DVD movies, rip and convert the movies into popular audio and video formats to portable devices such as iPod, iPad, iPad 3G+ WiFi, iPhone 4, Android smart phones (Motorala Droid X, HTC Evo 4G),Zune, Blackberry, PSP, Creative Zen, Xbox 360, Apple TV, PS3, WD TV, etc.
Download a free trial of Pavtube Blu-Ray Ripper for Mac (Intel processor only) and try it out so as to enjoy more from your blu-ray movies!
 Free Trial BDMagic for Mac

Useful Tips
- How to Play Blu-ray Movies on Android Tablet?
- Blu-ray ripping- how to keep 5.1 and 7.1 audio?
- [How to] Turn your Blu-rays to iTunes playable 1080p MP4 movies
- How to rip Blu-ray movies to Xvid encoded AVI video?
- Convert MKV to H.264 MP4 for streaming over DLNA
- Easy way to backup Blu-ray Movies with only Forced Subtitles


